
As I unrolled the soft sponge cake and watched those vibrant strawberries dance to meet the whipped cream, a wave of excitement washed over me. This No-Bake Strawberry Shortcake Sushi is not only a delightful twist on a classic dessert but also an invitation for every home chef to play with flavors and textures. With minimal prep time and the ability to customize it for vegan diets or mini versions, this recipe brings joy to any gathering without the hassle. Plus, it’s a crowd-pleaser that’s as fun to make as it is to eat! What will you add to your sushi-inspired creation?
Why is Strawberry Shortcake Sushi Unique?
Fun Twist: This dessert presents a playful take on traditional strawberry shortcake, inviting both children and adults alike to enjoy a fresh, no-bake delight.
Customizable Options: With easy adaptations for vegan diets and the option to create mini rolls, everyone can savor these treats guilt-free.
Impressive Presentation: Rolled sushi-style, each slice showcases vibrant strawberries and fluffy cream, making it perfect for parties or casual brunches.
Quick Prep Time: Enjoy a delicious dessert in under an hour, freeing you up to enjoy the company of your guests.
Endless Flavor Combinations: Experiment with different berries or a hint of citrus zest for a refreshing twist that keeps your dessert game exciting!
Strawberry Shortcake Sushi Ingredients
For the Cake
• Vanilla Sponge Cake – Provides structure and a soft base for easy rolling; opt for a flexible cake to avoid cracking.
For the Filling
• Fresh Strawberries – Offers a burst of fruity flavor and vibrant color; can substitute with raspberries or blueberries.
• Heavy Whipping Cream – Adds a rich, creamy filling; replace with coconut whipped cream for a vegan option.
• Powdered Sugar – Sweetens the whipped cream filling; adjust according to your taste preferences.
• Vanilla Extract – Enhances flavor; almond extract can be a fun alternative for a unique twist.
• Strawberry Jam – Adds fruity depth and helps adhere the filling; optional but recommended.
For the Topping
• Melted White Chocolate – An elegant drizzle for finishing; dark chocolate can be used for a deeper flavor.
Step‑by‑Step Instructions for Strawberry Shortcake Sushi
Step 1: Prepare Whipped Cream
In a chilled mixing bowl, combine heavy whipping cream, powdered sugar, and vanilla extract. Using an electric mixer, beat on medium-high speed until stiff peaks form, about 3 to 5 minutes. You’ll know it’s ready when the cream holds its shape and appears fluffy. This creamy mixture will serve as the luscious filling for your Strawberry Shortcake Sushi.
Step 2: Prepare Sponge Cake
Lay a sheet of parchment paper on your work surface and gently place the vanilla sponge cake on top. Using a sharp knife, trim the edges to create a neat rectangle that will make rolling easier and prevent cracking during the assembly process. This careful prep ensures that your Strawberry Shortcake Sushi has a beautiful, professional finish.
Step 3: Layer Filling
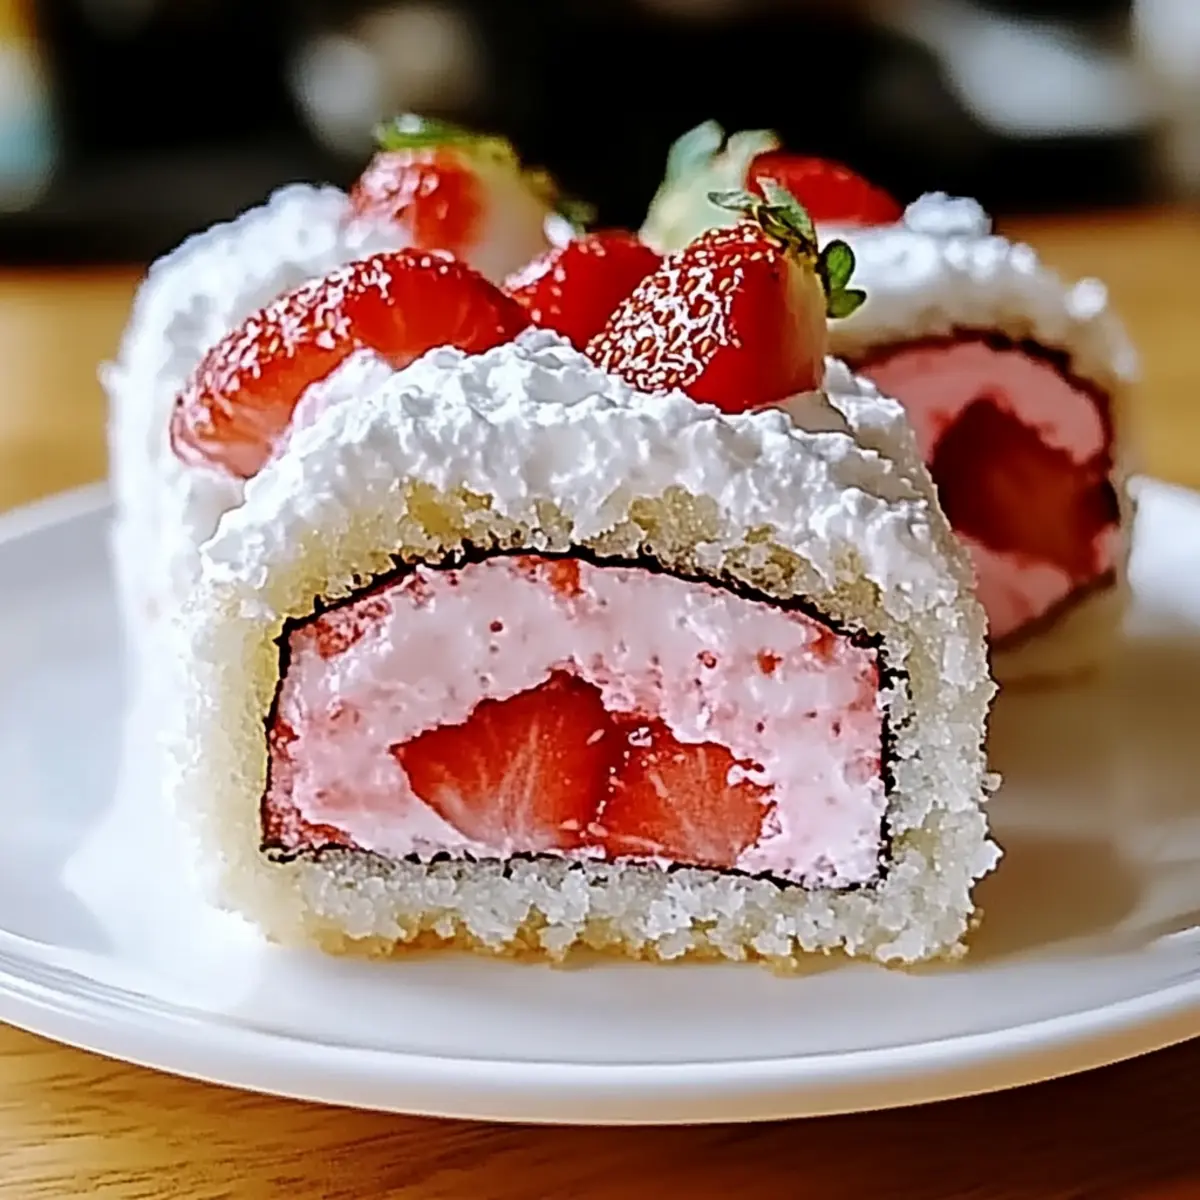
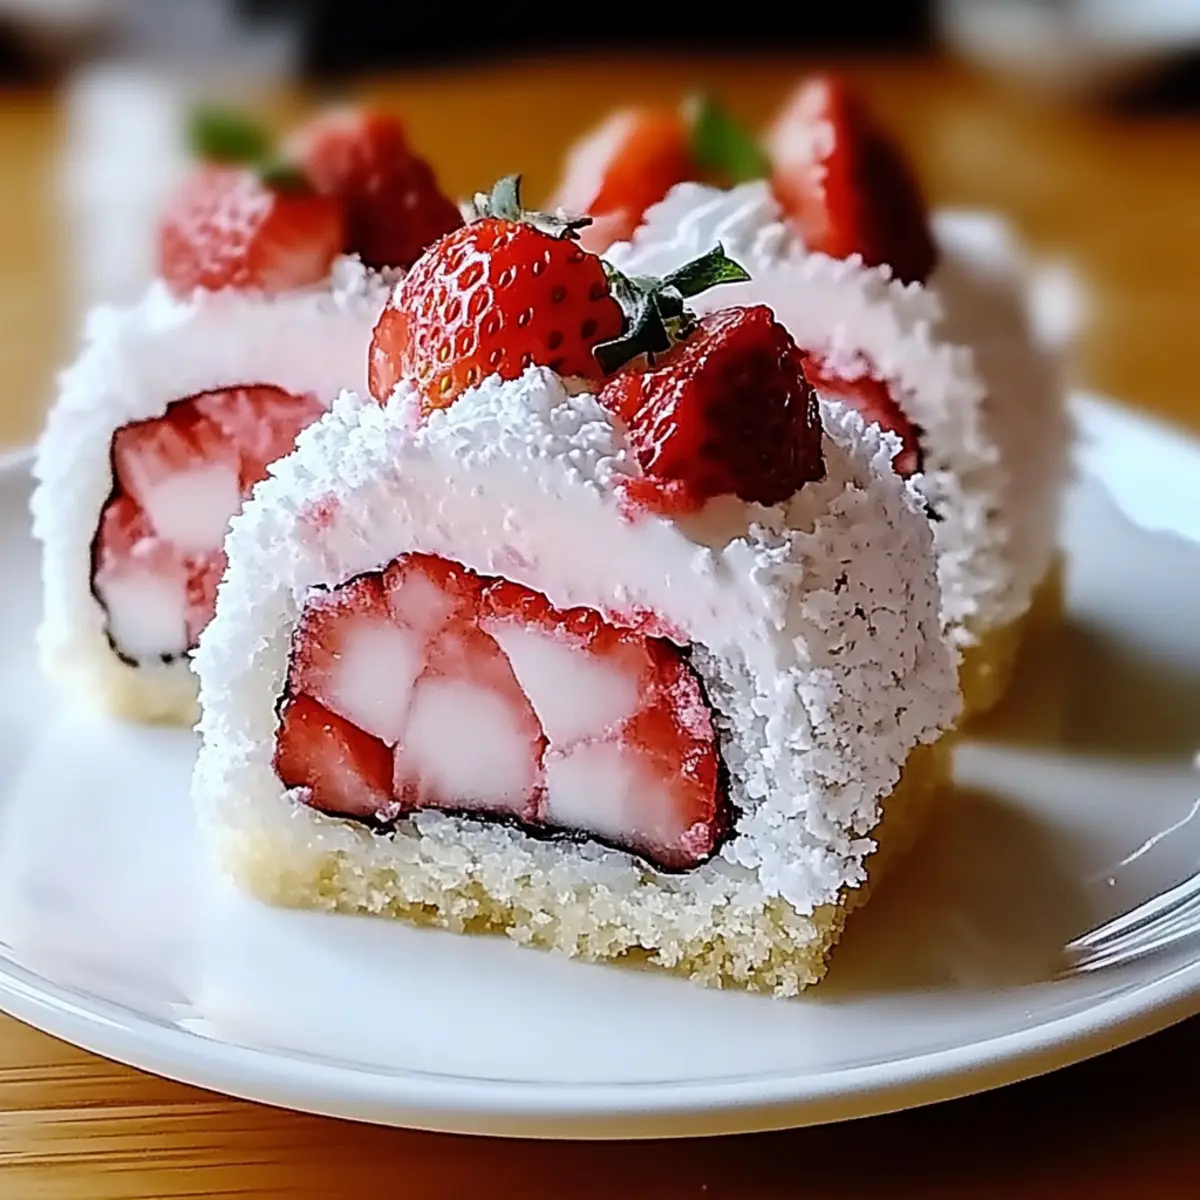
Spread a thin layer of strawberry jam evenly over the sponge cake, leaving a small border around the edges. Next, take your freshly whipped cream and spoon a generous layer over the jam. Spread it evenly with a spatula, ensuring you create a delightful base for the strawberries that follows. This delicious filling is the heart of your Strawberry Shortcake Sushi.
Step 4: Add Strawberries
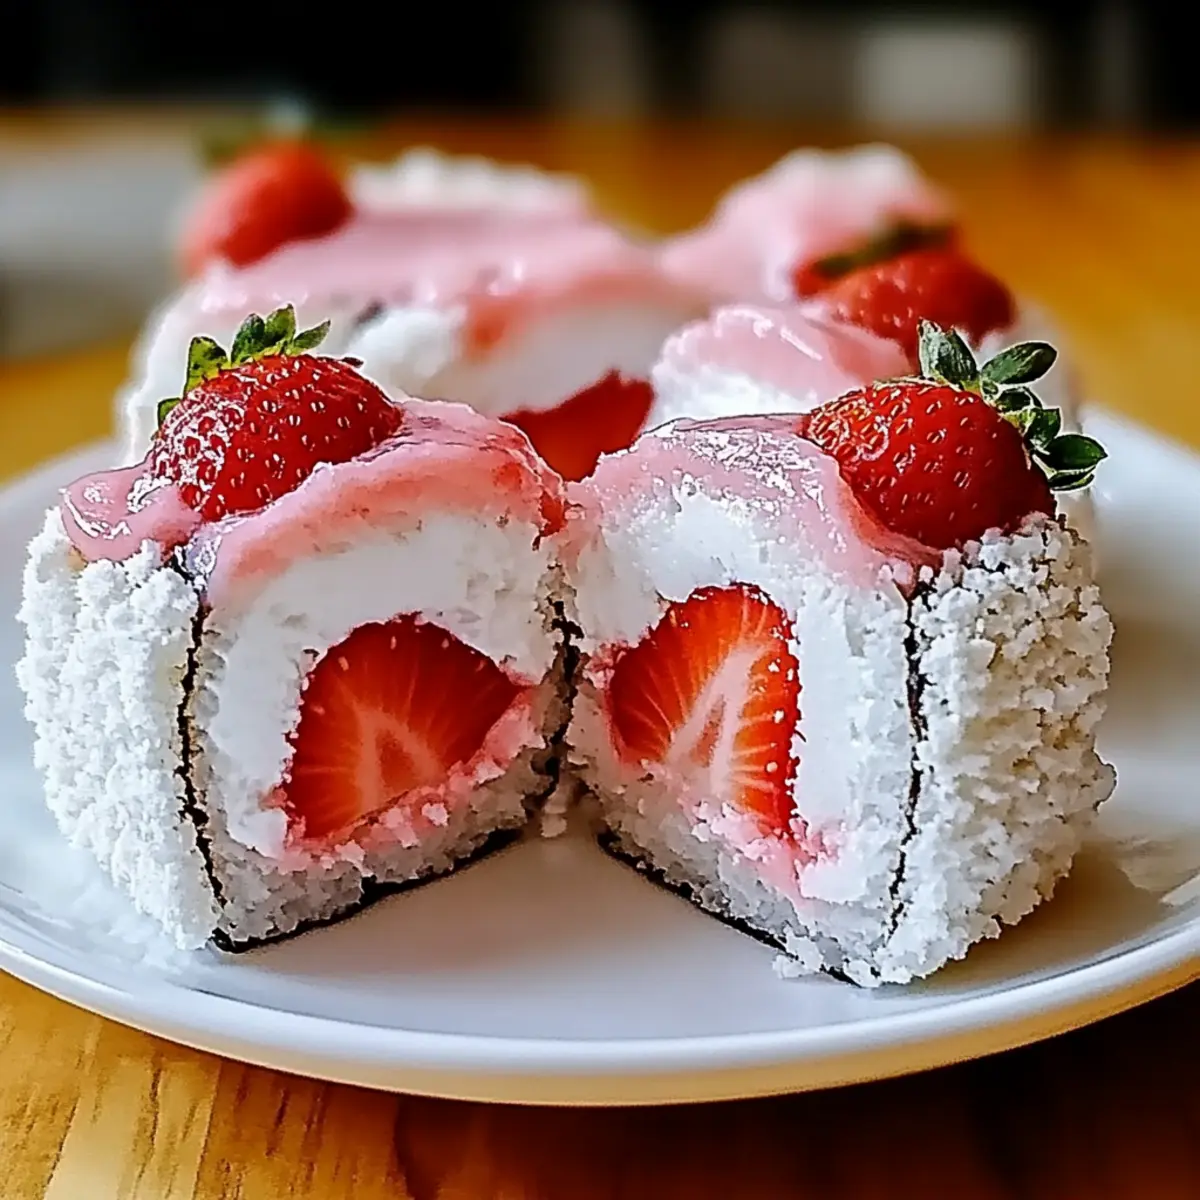
Carefully slice fresh strawberries and arrange them in a line along one edge of the sponge cake. Make sure to place them close together for optimal flavor in each bite. The vibrant red berries will create a beautiful contrast against the white filling, enhancing both the taste and visual appeal of your Strawberry Shortcake Sushi.
Step 5: Roll Cake
Using the parchment paper for assistance, gently begin rolling the cake away from the edge with the strawberries. Tuck the filling as you roll to ensure it stays snug and firm. Roll tightly but not too forcefully to avoid cracking the cake, creating a lovely sushi-style log that will be sliced later.
Step 6: Chill
Wrap the rolled cake tightly in plastic wrap and refrigerate for 45 to 60 minutes. This chilling step helps the flavors meld together and firms up the roll, making it easier to slice cleanly. Be patient; the wait will be worth the stunning presentation of your Strawberry Shortcake Sushi!
Step 7: Slice and Serve
Once chilled, carefully unwrap the roll and place it on a cutting board. Using a sharp knife, slice the roll into 1-inch pieces, wiping the knife with hot water between cuts for clean edges. Arrange the beautiful sushi-style pieces on a serving platter, and if desired, drizzle with melted white chocolate for an elegant finishing touch.
What to Serve with No-Bake Strawberry Shortcake Sushi
Elevate your no-bake dessert experience with delightful accompaniments that balance sweetness and texture.
-
Mint-Infused Fruit Salad:
A refreshing fruit salad invigorated with mint complements the creamy sushi perfectly, adding a light and zesty note. -
Sparkling Lemonade:
The effervescence of sparkling lemonade cuts through the richness of the sushi, providing a delightful contrast and a fun fizz. -
Coconut Milk Ice Cream:
Creamy and cool, coconut milk ice cream harmonizes beautifully with the strawberry flavors, making each bite feel indulgent. -
Chocolate-Dipped Strawberries:
The sweetness of chocolate-dipped strawberries echoes the flavors of the sushi while adding an elegant touch to your dessert table. -
Homemade Whipped Cream:
Serve extra whipped cream on the side for those who crave an additional layer of creamy richness—you can never have too much! -
Matcha Green Tea:
This earthy beverage offers a unique counterpoint to the sweetness of the dessert, bringing a refreshing depth to your meal experience.
Explore these pairings to create a vibrant feast that turns your Strawberry Shortcake Sushi into an irresistible treat for all!
Storage Tips for Strawberry Shortcake Sushi
-
Refrigerator: Store any leftover Strawberry Shortcake Sushi in an airtight container for up to 2 days, ensuring it stays fresh and maintains its delightful texture.
-
Freezer: For longer storage, wrap individual slices tightly in plastic wrap and place them in a freezer-safe bag. They can be kept for up to 1 month; thaw overnight in the refrigerator before enjoying.
-
Reheating: For the best flavor experience, serve the sushi cold or at room temperature. Avoid reheating in the microwave, as it may compromise the texture of the whipped cream and sponge cake.
-
Pre-Making: You can assemble the sushi a day in advance. Just make sure to refrigerate it wrapped so it remains fresh until serving!
Expert Tips for Strawberry Shortcake Sushi
-
Chill Everything: Keep your mixing bowl and cream chilled for optimal whipped cream texture. Warm cream won’t whip up as stiff, so refrigerate beforehand.
-
Gentle Rolling: Roll the sponge cake tightly but gently to prevent cracking. If it cracks, don’t panic! Just press it back together gently.
-
Knife Care: Wipe your knife with hot water between cuts for cleaner slices. This will help maintain the beauty of your Strawberry Shortcake Sushi, ensuring a stunning presentation.
-
Don’t Overfill: Avoid over-filling the cake with whipped cream and strawberries. This simplifies rolling and keeps your sushi from bursting at the seams.
-
Experiment with Flavors: Try different berries or add citrus zest to your whipped cream. This adds a delightful twist to your Strawberry Shortcake Sushi!
Strawberry Shortcake Sushi Variations
Feel free to get creative and personalize your Strawberry Shortcake Sushi with these delightful twists!
-
Mini Rolls: Cut the sponge cake into smaller rectangles for adorable, bite-sized sushi that’s perfect for parties. These little treats will have everyone coming back for seconds!
-
Vegan Option: Substitute heavy whipping cream with coconut whipped cream and use a plant-based sponge cake for a delicious vegan treat that doesn’t skimp on flavor. Your plant-based friends will be thrilled!
-
Chocolate-Dipped: For a gourmet touch, dip the finished sushi rolls in melted dark chocolate. This adds richness and an irresistible crunch that is sure to impress!
-
Berry Mix: Switch up the flavor by using a mix of fresh berries like raspberries and blueberries. Each bite will surprise your taste buds with vibrant flavors that light up your dessert table.
-
Citrus Zing: Add a burst of freshness by incorporating orange or lemon zest into the whipped cream. This refreshing note will elevate your sushi and make it stand out.
-
Nutty Crunch: Stir in crushed nuts, such as almonds or hazelnuts, into the filling for an added texture and flavor that contrasts beautifully with the soft sponge cake.
-
Spicy Kick: For the adventurous, mix a pinch of cayenne pepper or chili powder into the whipped cream for a surprising heat that plays off the sweetness. Just a touch will do!
-
Herb Infusion: Consider adding fresh mint or basil into the whipped cream for a fresh, aromatic herbal twist that enhances the fruity elements of your sushi. These subtle notes can create a complex and enjoyable experience.
Explore these variations and celebrate the fun of creating your very own Strawberry Shortcake Sushi masterpiece!
Make Ahead Options
These Strawberry Shortcake Sushi are ideal for those busy days when time is of the essence! You can prepare the sponge cake and whipped cream filling up to 24 hours in advance. Simply bake the sponge cake, let it cool completely, and then wrap it tightly in plastic wrap to keep it moist. The whipped cream can also be whipped and stored in an airtight container in the refrigerator. When you’re ready to serve, spread a thin layer of strawberry jam on the cake, layer in the sliced strawberries, and roll everything together. Chill for at least 45 minutes before slicing, and you’ll have a delightful dessert ready to impress without added stress!

Strawberry Shortcake Sushi Recipe FAQs
What type of sponge cake should I use for this recipe?
A vanilla sponge cake is ideal as it provides a soft yet firm structure for rolling. Opt for a flexible sponge to prevent cracking while rolling. If you’re in a pinch, store-bought cakes can work too, but a homemade sponge generally offers a fresher taste and texture.
How should I store leftover Strawberry Shortcake Sushi?
Store leftover slices in an airtight container in the refrigerator for up to 2 days to maintain freshness. If you want to keep it longer, wrap individual slices tightly in plastic wrap and place them in a freezer-safe bag. They can be frozen for up to 1 month; just remember to thaw them overnight in the refrigerator before serving!
Can I freeze Strawberry Shortcake Sushi?
Absolutely! To freeze, wrap slices tightly in plastic wrap, then place them in a freezer-safe bag. This helps preserve the shape and texture. For the best taste, consume within 1 month, and thaw overnight in the refrigerator when you’re ready to enjoy them again.
What if the whipped cream doesn’t whip properly?
If your whipped cream isn’t reaching stiff peaks, it might be due to warm ingredients. Make sure to chill both your mixing bowl and the heavy whipping cream beforehand. If it still doesn’t whip, try adding a little gelatin or cornstarch to stabilize it, or start fresh with cold ingredients.
Are there vegan alternatives for this recipe?
Yes! For a vegan adaptation, you can use coconut whipped cream instead of heavy whipping cream. For the sponge cake, opt for a plant-based recipe or look for store-bought vegan sponge cakes. Many brands cater to these dietary needs, ensuring everyone can enjoy this delightful Strawberry Shortcake Sushi!
Can I modify the fruit in this recipe?
The more the merrier! Feel free to switch out strawberries for other berries like blueberries or raspberries. You could even mix them together for a colorful twist! Just ensure that the chosen fruit is ripe and flavorful to maintain that burst of taste with every bite.
Strawberry Shortcake Sushi: Delightful No-Bake Dessert Fun
Ingredients
Equipment
Method
- Prepare Whipped Cream: In a chilled mixing bowl, combine heavy whipping cream, powdered sugar, and vanilla extract. Beat on medium-high speed until stiff peaks form, about 3 to 5 minutes.
- Prepare Sponge Cake: Lay a sheet of parchment paper on your work surface and place the vanilla sponge cake on top. Trim the edges to create a neat rectangle.
- Layer Filling: Spread a thin layer of strawberry jam over the sponge cake, then spoon a generous layer of whipped cream over the jam.
- Add Strawberries: Slice fresh strawberries and arrange them along one edge of the sponge cake, placing them close together.
- Roll Cake: Gently roll the cake using the parchment paper. Tuck the filling as you roll to keep it snug, forming a sushi-style log.
- Chill: Wrap the rolled cake in plastic wrap and refrigerate for 45 to 60 minutes to help flavors meld together.
- Slice and Serve: Unwrap the roll, slice it into 1-inch pieces using a sharp knife, and arrange on a serving platter. Drizzle with melted white chocolate if desired.
Leave a Reply