
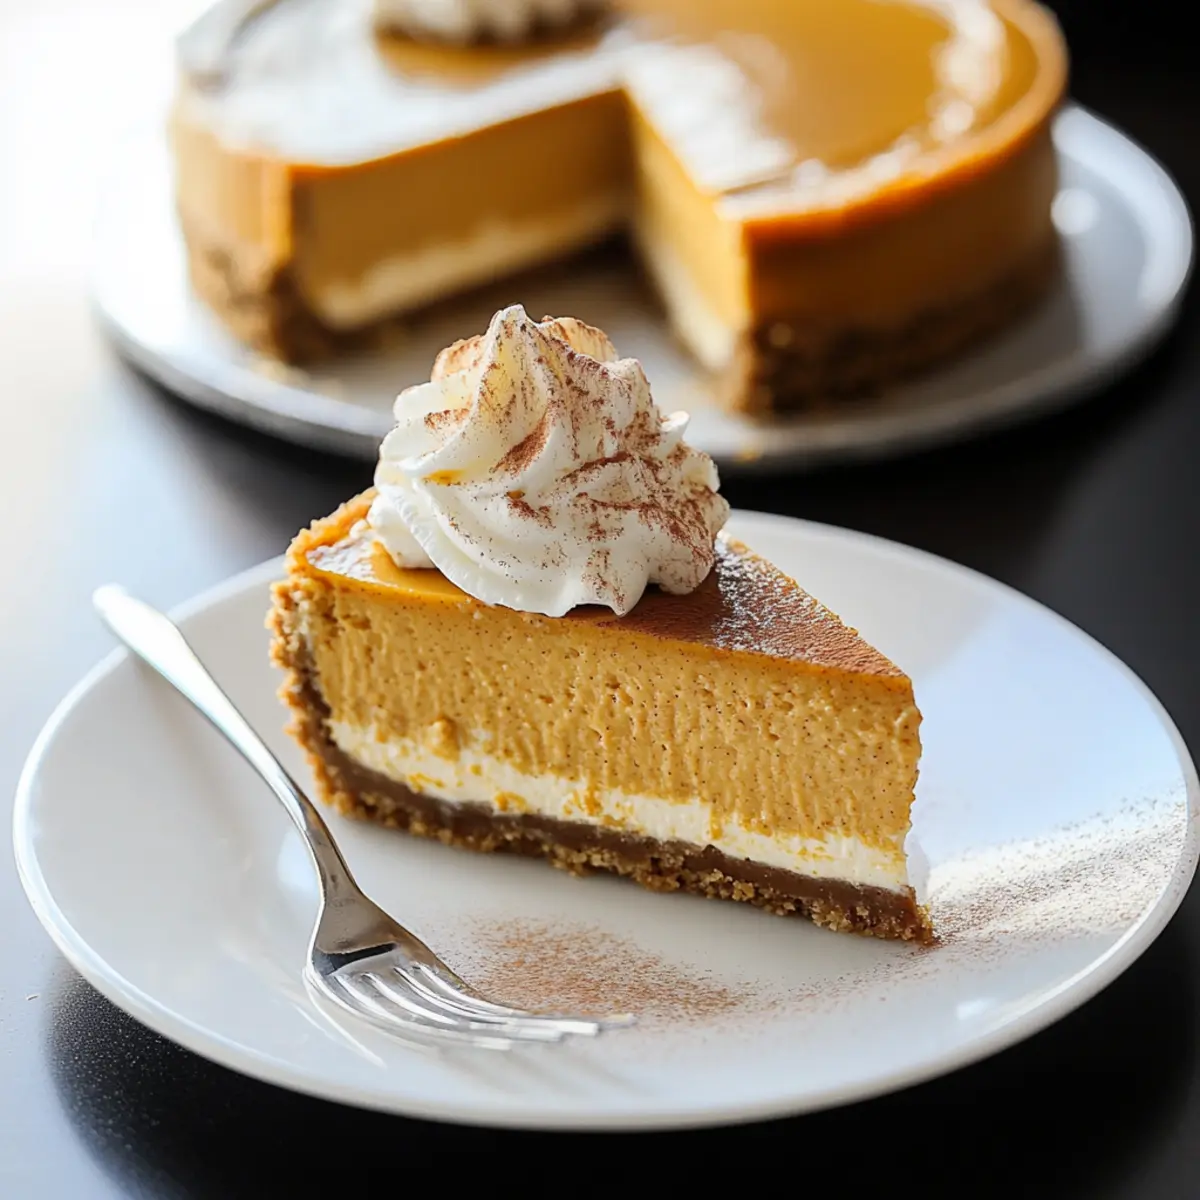
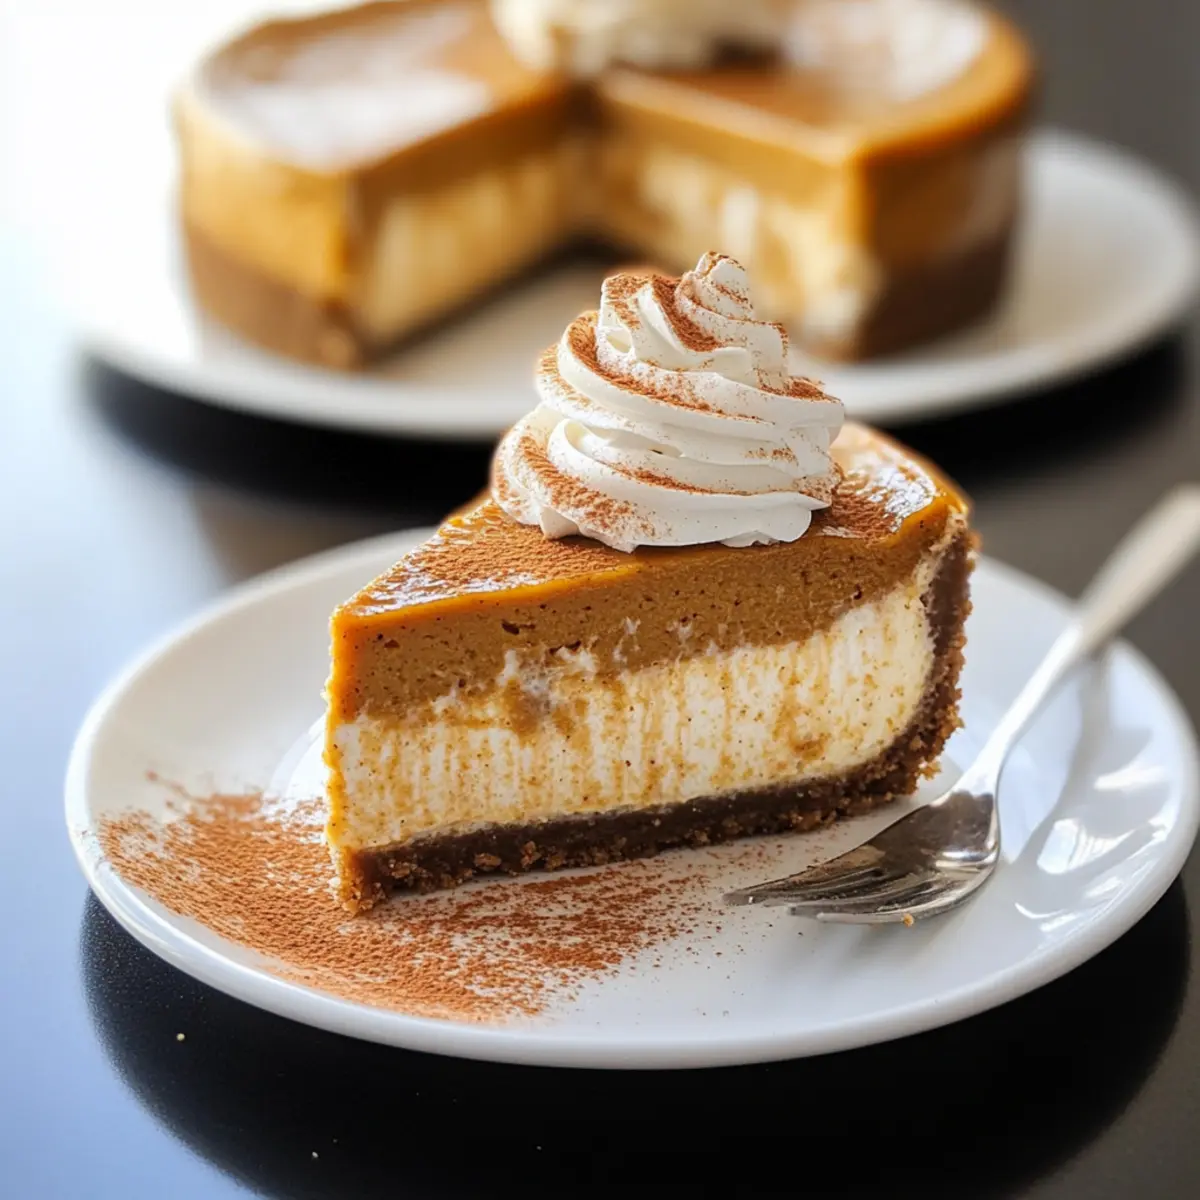
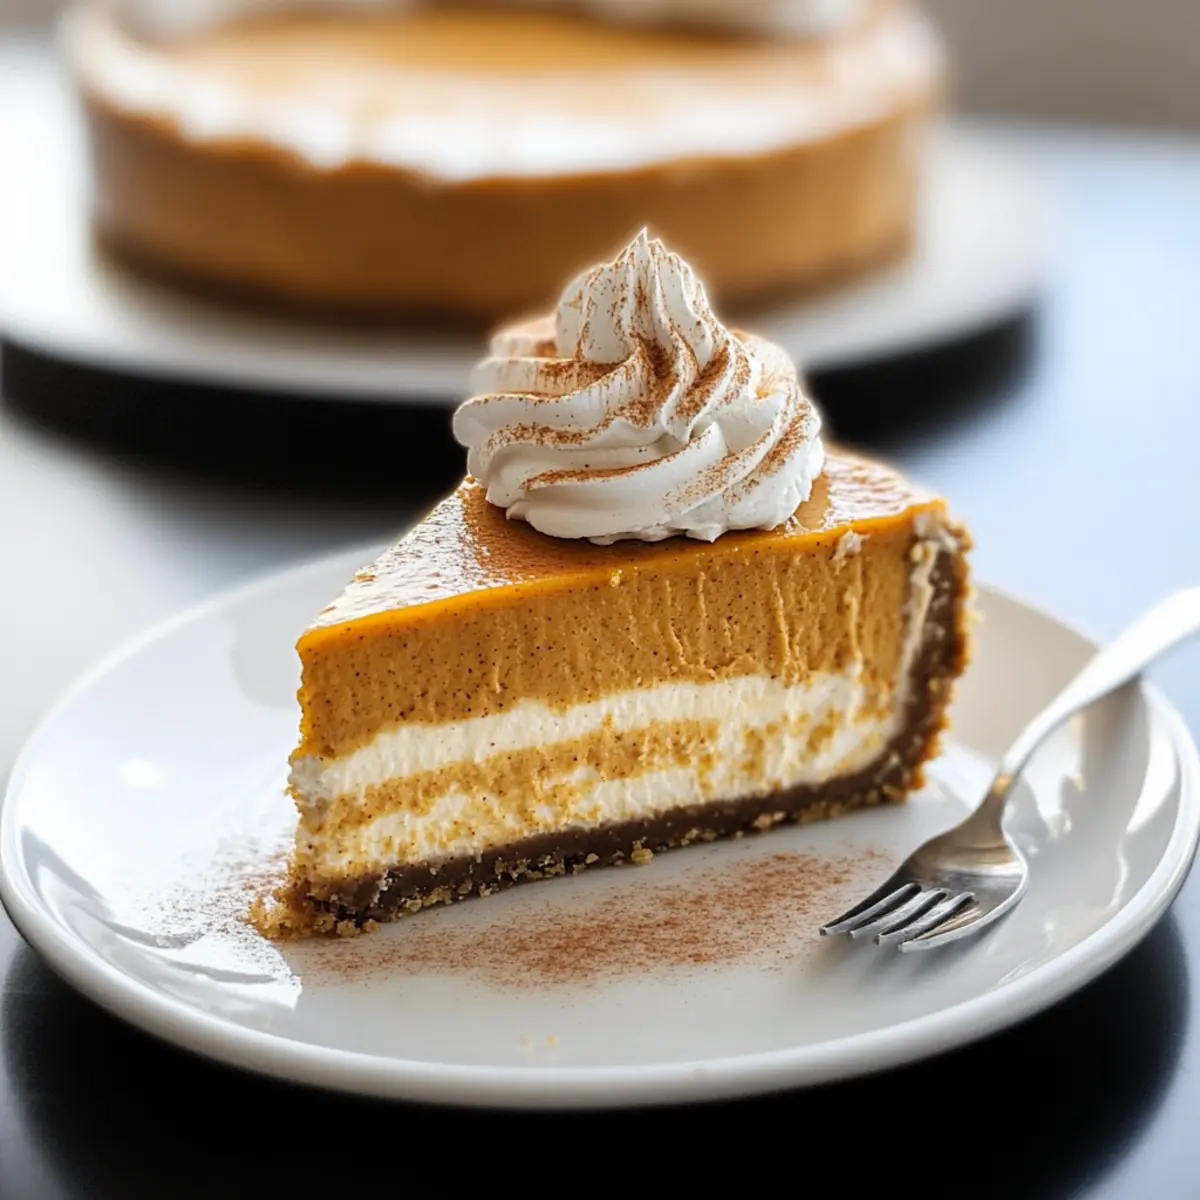
The aroma of autumn wafted through my kitchen as I prepared a dish that feels like a warm hug on a chilly day—Creamy No-Bake Pumpkin Cheesecake. Blending velvety cream cheese with the rich flavors of pumpkin and warm spices, this dessert captures the essence of Thanksgiving in every bite. What I love most about this recipe is how easy it is to whip up without a water bath, making it a perfect choice for both seasoned bakers and beginners alike. Plus, it’s a crowd-pleaser that allows you to enjoy dessert without spending hours in the kitchen. Who wouldn’t want to impress guests with a stunning cheesecake that’s both delightful and effortless? Are you ready to dive into the warmth of fall with this simple, yet incredibly delicious recipe?

Why is Pumpkin Cheesecake a Must-Try?
Easy to Make: This creamy no-bake pumpkin cheesecake requires minimal effort and no complicated techniques, perfect for busy bakers.
Rich, Festive Flavor: The delightful blend of pumpkin and warm spices creates an inviting taste that embraces the essence of autumn.
Winner for Every Occasion: Be it Thanksgiving, a birthday, or just a cozy night in, this cheesecake is sure to impress and satisfy everyone’s sweet tooth.
Versatile Options: You can easily switch to gingersnap crust for a spicier twist and top it with fresh whipped cream or caramel sauce for added flair.
No Long Waits: The quick prep time and simple chilling process allow for instant gratification—you can prepare it ahead and enjoy it at your leisure.
Crowd Favourite: With a creamy texture and a satisfying crunch from the crust, it guarantees rave reviews from your family and friends. Ready to elevate your dessert game? Check out my Mini Pumpkin Bread for more pumpkin-inspired treats!
Pumpkin Cheesecake Ingredients
For the Crust
• Graham Crackers – A delightful base for the crust; provides texture and sweetness. Substitution: Use gingersnap cookies for a spiced flavor.
• Granulated Sugar – Sweetens both the crust and filling; are essential for balancing flavors.
• Butter – Binds the crust together while adding a rich flavor. Use unsalted butter for better control over salt levels.
For the Filling
• Cream Cheese – The star of the filling; gives that creamy texture and tanginess. Note: Use full-fat cream cheese for the best texture.
• Vanilla Extract – Adds depth to the overall flavor profile; opt for pure vanilla for a richer taste.
• Pure Pumpkin – A key flavor element that contributes moisture and a stunning color. Use Libby’s brand for the best results.
• Pumpkin Pie Spice – A lovely blend of spices that enhances the autumn flavor; can be substituted with cinnamon, nutmeg, and ginger.
• Cinnamon – Introduces warmth and sweetness to the filling.
• Eggs – Essential for structure and stability in the cheesecake; use room temperature eggs for even mixing.
Now you’re all set to create an unforgettable Pumpkin Cheesecake!
Step‑by‑Step Instructions for Pumpkin Cheesecake
Step 1: Prepare the Crust
Preheat your oven to 350°F (175°C). In a mixing bowl, combine crushed graham crackers, granulated sugar, and melted unsalted butter until mixture feels like damp sand. Firmly press this mixture into the bottom of a 9-inch springform pan to create an even layer. Bake for 7 minutes, until lightly golden, then remove from oven to cool while you prepare the filling.
Step 2: Mix the Cream Cheese Filling
In a large bowl, beat room temperature cream cheese with an electric mixer on medium speed until creamy and smooth. Gradually add in granulated sugar, mixing well to ensure there are no lumps. This step is crucial for a velvety Pumpkin Cheesecake; scrape down the sides of the bowl to incorporate all ingredients evenly.
Step 3: Add Flavors
Incorporate the pure vanilla extract, canned pure pumpkin, pumpkin pie spice, and ground cinnamon into the cream cheese mixture. Blend until the mixture is smooth and well-combined, resembling a consistent, creamy batter. This is where the warm flavors come together, creating the delightful taste you’re aiming for in your pumpkin cheesecake.
Step 4: Incorporate the Eggs
Beat the eggs in a separate bowl until fully blended. Slowly add the eggs to the pumpkin cream cheese mixture, mixing gently at low speed to avoid overmixing, which can introduce air pockets. Ensure the eggs are fully integrated without lumps, and be sure to scrape the sides of the bowl as you mix the filling one last time.
Step 5: Prepare for Baking
Gently tap the bowl against the counter to release any trapped air bubbles, ensuring a smooth final texture for your Pumpkin Cheesecake. Carefully pour the filling into the cooled crust, smoothing out the top with a spatula. This helps to create an even surface, setting you up for a beautiful cheesecake.
Step 6: Bake the Cheesecake
Bake the cheesecake in the preheated oven at 325°F (163°C) for 40 minutes, then lower the temperature to 250°F (121°C) and continue baking for an additional 45 minutes. Keep an eye on the cheesecake; it should be set around the edges but still slightly jiggly in the center, indicating a creamy texture.
Step 7: Cool and Chill
Once baked, turn off the oven and prop the door open slightly, allowing the cheesecake to cool in the oven for about 1 hour. This gradual cooling helps prevent cracking. Afterward, refrigerate the cheesecake for at least 6 hours, or overnight if possible, to allow the flavors to meld beautifully.
Step 8: Serve Your Masterpiece
When ready to serve your Pumpkin Cheesecake, carefully remove it from the springform pan. Garnish with fresh whipped cream and a sprinkle of cinnamon for a lovely touch. The rich, creamy texture combined with the spiced flavor makes this dessert a perfect conclusion to your fall celebrations. Enjoy!
Expert Tips for Pumpkin Cheesecake
• Room Temperature Ingredients: Ensure cream cheese and eggs are at room temperature for a smooth filling, preventing lumps in your pumpkin cheesecake.
• Avoid Overmixing: Mix gently after adding eggs to avoid incorporating too much air, which can lead to cracks in the cheesecake surface.
• Tap It Out: Don’t forget to tap the filled cheesecake on the counter before baking; this helps release air bubbles for a smoother finish.
• Cooling Method: Allow the cheesecake to cool gradually in the oven to minimize the risk of cracking—patience is key for perfect results!
• Decorative Finish: If cracks do appear, whipped cream or chocolate ganache makes a delightful cover-up and adds an extra layer of flavor to your pumpkin cheesecake.
Pumpkin Cheesecake: Variations & Substitutions
Get ready to make this creamy dessert your own with a few fun adjustments that will tickle your taste buds!
-
Gingersnap Crust: Swap graham cracker crumbs for gingersnaps to add a delicious spicy twist to your crust. The extra warmth of the ginger will elevate your cheesecake to new levels.
-
Sugar-Free Option: Substitute granulated sugar with your favorite sugar substitute, like erythritol or stevia, for a low-calorie treat that still delights. Just ensure it’s equal to sugar in sweetness!
-
Spice It Up: Add a pinch of nutmeg or cloves to the filling for an extra layer of flavor that brings out the warmth of fall. It adds depth and enhances the overall pumpkin essence.
-
Nutty Flavor: Incorporate crushed pecans or walnuts into the crust mixture for added crunch and nuttiness, creating a delightful texture that pairs wonderfully with the creamy filling.
-
Cheesecake Swirl: For added flair, swirl in a chocolate or caramel sauce into the filling before baking to playfully surprise your guests with rich flavors in each bite.
-
Dairy-Free Delight: Use dairy-free cream cheese and coconut milk for a delicious vegan version of this pumpkin cheesecake. You won’t miss the dairy at all!
-
Caramel Topping: Drizzle warm caramel over the chilled cheesecake right before serving for an indulgent twist; it amplifies the dessert’s richness while adding an irresistible sweetness.
-
Mini Cheesecake Bites: Make individual mini cheesecakes using muffin tins! Use cupcake liners and adjust the baking time for bite-sized portions of joy that are perfect for gatherings. Consider pairing these with my delightful Red Velvet Cheesecake for a beautiful dessert spread!
Feel free to experiment; these variations will keep your pumpkin cheesecake exciting and tailored to your taste!
How to Store and Freeze Pumpkin Cheesecake
Fridge: Store your pumpkin cheesecake in the refrigerator, tightly wrapped in plastic wrap or in an airtight container. It will stay fresh for up to 7 days.
Freezer: For longer-term storage, you can freeze the cheesecake. Wrap it tightly in plastic wrap and then in aluminum foil. It can last up to 2 months in the freezer.
Thawing: To enjoy, transfer the frozen pumpkin cheesecake to the fridge to thaw overnight before serving. Avoid refreezing once it has been thawed for the best texture.
Serving Tip: Bring the cheesecake to room temperature before serving for enhanced flavor and a creamy texture that guests will love!
What to Serve with Creamy No-Bake Pumpkin Cheesecake
A wonderful dessert deserves the perfect companions to create a memorable meal experience.
- Whipped Cream: A generous dollop of freshly whipped cream adds a light and airy touch, perfectly balancing the cheesecake’s rich texture.
- Spiced Apple Cider: Warm spiced apple cider enhances the cozy fall vibe, offering a sweet and slightly tangy contrast to the cheesecake’s creaminess.
- Gingersnap Cookies: Serve alongside crunchy gingersnap cookies for a delightful complement, echoing the warm spices in the cheesecake for added texture.
- Pecan Pie: This classic dessert brings a nutty crunch to the table, introducing another layer of flavor that pairs beautifully with pumpkin.
- Vanilla Ice Cream: A scoop of creamy vanilla ice cream adds a delightful chill and smoothness, creating a tantalizing contrast to the warm flavors of the cheesecake.
- Chocolate Drizzle: A rich, chocolate drizzle over the cheesecake elevates its presentation and flavor, offering a sweet indulgence to satisfy any sweet tooth.
- Fresh Fruit Salad: A refreshing mix of berries and citrus provides a light, fruity element that cuts through the richness of the cheesecake, balancing each bite.
- Coffee or Espresso: A warm cup of coffee or creamy espresso serves as a perfect finishing touch, enhancing the dessert flavors while providing a delightful wake-up kick.
- Caramel Sauce: Drizzling caramel sauce over your cheesecake adds a luscious sweetness that enhances its autumnal flavors and offers a tempting appeal.
Make Ahead Options
These Creamy No-Bake Pumpkin Cheesecakes are perfect for meal prep, allowing you to enjoy exquisite flavors without the last-minute stress! You can prepare the crust and filling up to 24 hours in advance. Simply mix the graham cracker crust and press it into the springform pan, then refrigerate it. For the filling, blend all components and pour it into the crust, covering it tightly with plastic wrap. When you’re ready to serve, bake the cheesecake as directed, and let it chill for at least 6 hours or overnight for the best results. By preparing ahead, you’ll have a delicious dessert that’s just as creamy and rich—perfect for impressing family and friends while saving you precious time!
Pumpkin Cheesecake Recipe FAQs
How do I select ripe pumpkins for the cheesecake?
Absolutely! When choosing canned pumpkin, I recommend using Libby’s brand for its authenticity and flavor consistency. If opting for fresh pumpkin, look for ones that are firm with deep, rich orange color. Avoid any with soft spots or blemishes. Small to medium-sized pumpkins, like sugar pumpkins, tend to be sweeter and perfect for making cheesecake.
What’s the best way to store leftover pumpkin cheesecake?
To keep your pumpkin cheesecake fresh, wrap it tightly in plastic wrap or store it in an airtight container. It will last in the refrigerator for up to 7 days. I often enjoy mine the next day, as the flavors really meld overnight!
Can I freeze pumpkin cheesecake, and what’s the best method?
Absolutely! To freeze your pumpkin cheesecake, make sure it’s fully cooled and wrapped tightly in plastic wrap, then double wrap it in aluminum foil to prevent freezer burn. It can last up to 2 months. When you’re ready to enjoy it, simply transfer it to the fridge to thaw overnight before serving.
What should I do if my pumpkin cheesecake cracks?
If your cheesecake cracks, don’t worry! It happens even to the best bakers. You can cover cracks with a dollop of whipped cream or a drizzle of chocolate ganache. Ensure to avoid overmixing the filling after adding eggs to reduce the chances of cracking in the first place.
Are there any dietary considerations I should keep in mind?
Very! If you’re preparing this dessert for someone with dietary restrictions, consider using low-fat cream cheese instead of full-fat for a lighter option; however, keep in mind that this may alter the texture. Also, if creating a pet-friendly version for your furry friends, opt to leave out the sugar and spices, as many spices—including nutmeg—can be harmful to pets. Always double-check ingredient labels for potential allergens as well!
Can I use fresh pumpkin instead of canned for this recipe?
Of course! If you want to use fresh pumpkin, you’ll need to prepare it first. Start by cutting a sugar pumpkin in half and removing the seeds. Roast it in a 400°F oven for about 45 minutes until tender. Once cooled, scoop out the flesh and puree it in a blender until smooth. This fresh puree is delicious, though using canned is more convenient and ensures consistent results!
Creamy Pumpkin Cheesecake That'll Wow Your Guests
Ingredients
Equipment
Method
- Preheat oven to 350°F (175°C). In a bowl, combine crushed graham crackers, sugar, and melted butter until damp sand consistency. Press into a 9-inch springform pan. Bake for 7 minutes, then cool.
- In a large bowl, beat cream cheese until creamy. Gradually add sugar, mixing well to ensure smoothness.
- Add vanilla, pumpkin, pumpkin pie spice, and cinnamon to cream cheese mixture. Blend well until smooth and creamy.
- In a separate bowl, beat eggs until blended. Slowly incorporate them into the filling, mixing gently to avoid lumps.
- Pour filling into cooled crust, smoothing the top. Bake at 325°F (163°C) for 40 minutes, then reduce temperature to 250°F (121°C) for another 45 minutes.
- Turn off oven and prop door open. Let cool for 1 hour, then refrigerate for at least 6 hours or overnight.
- Remove from springform pan, garnish with whipped cream and cinnamon, and serve.
Leave a Reply