
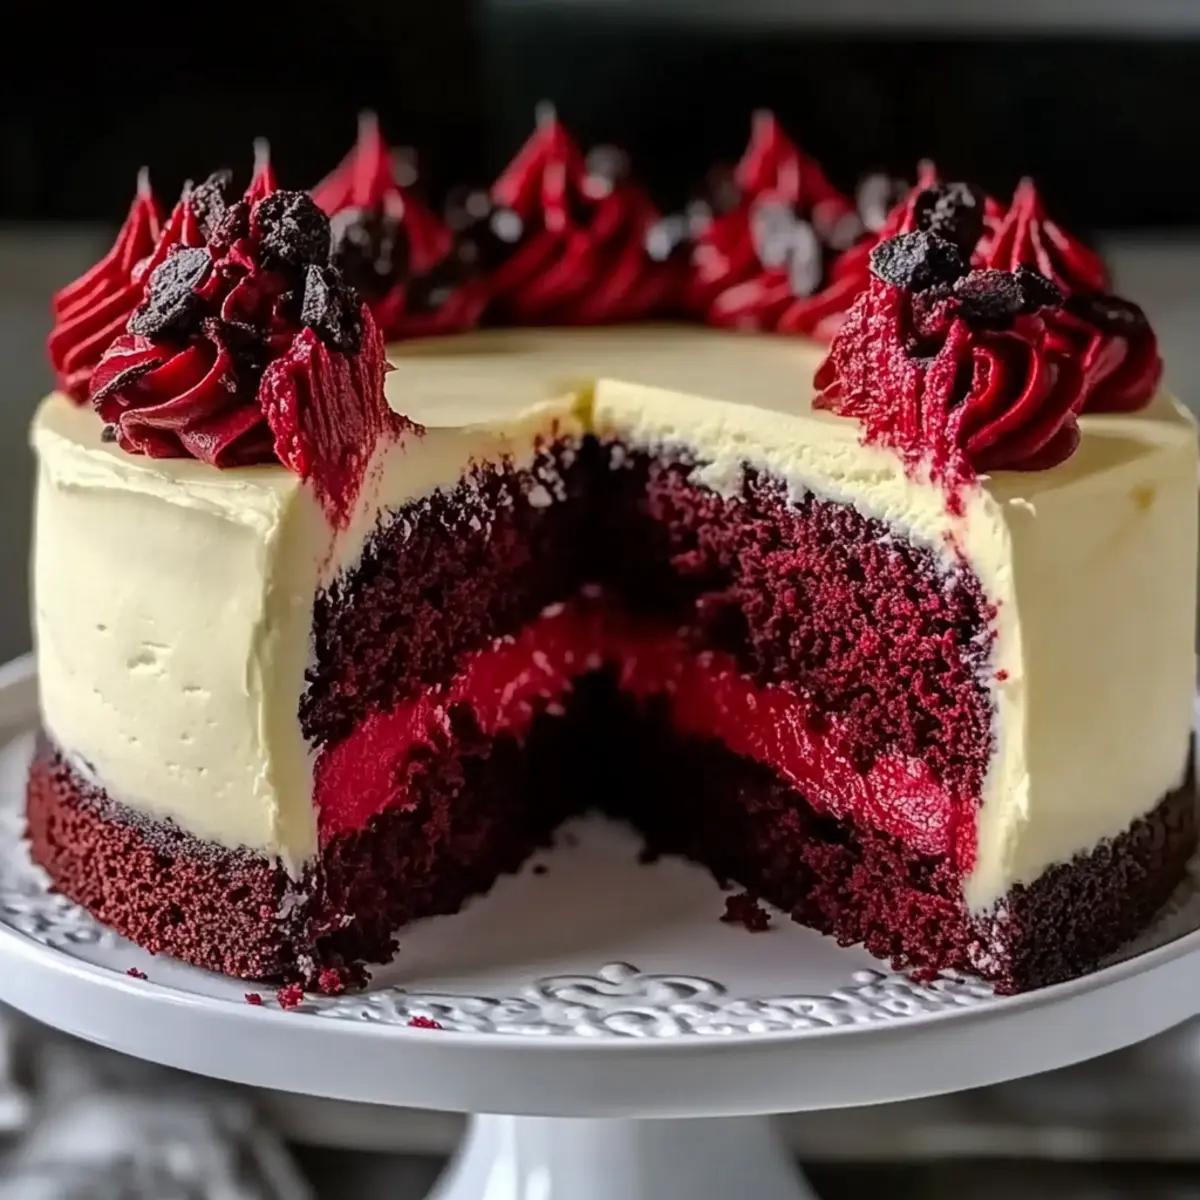
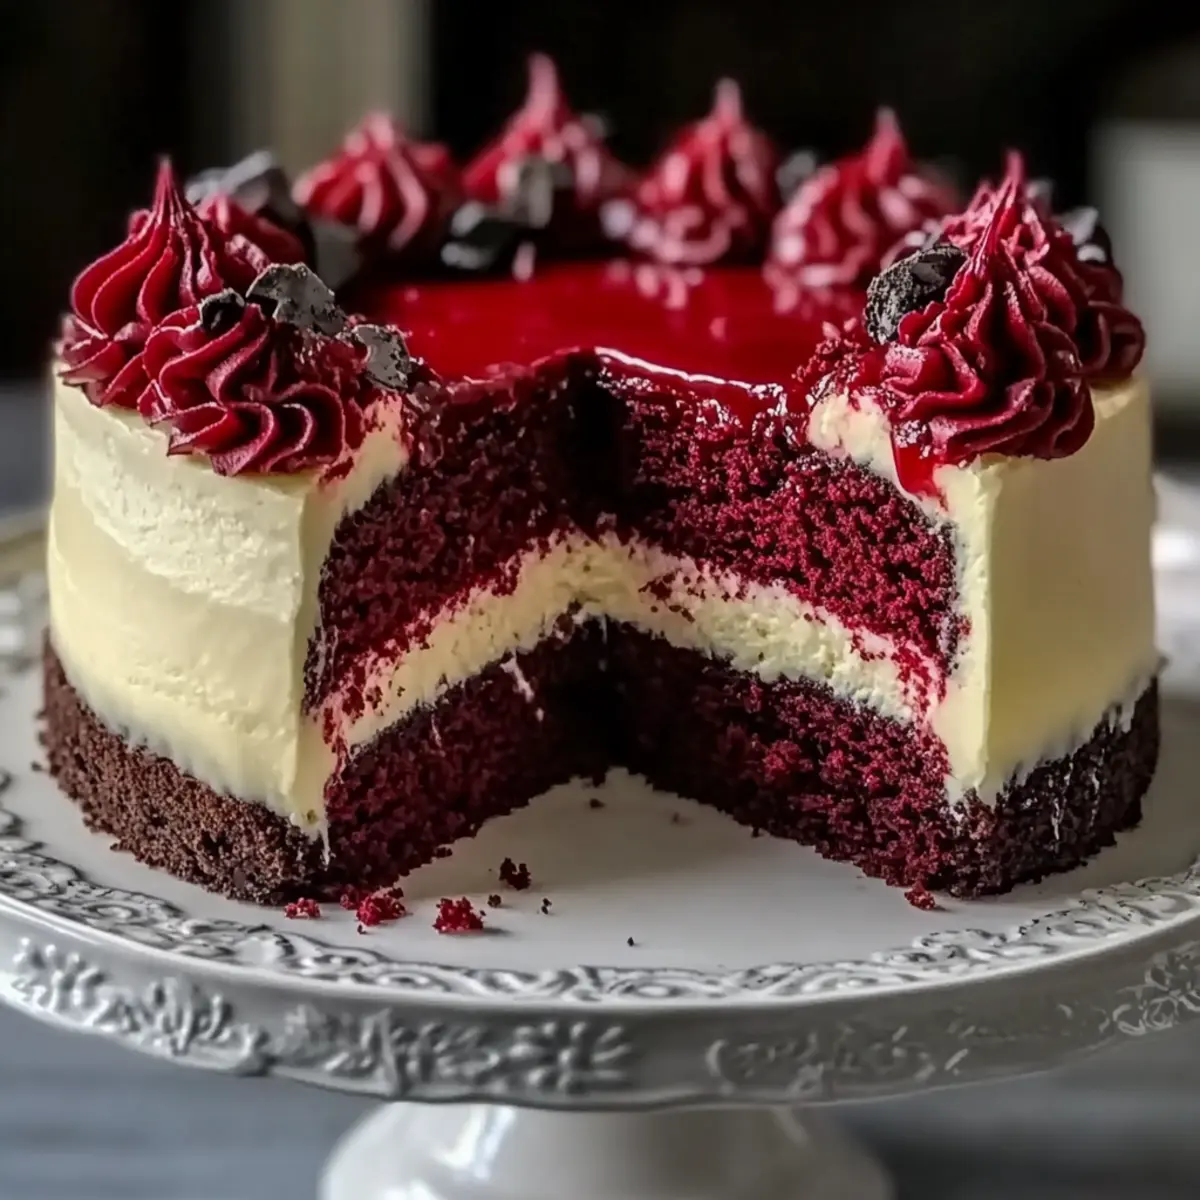
As I stood in my kitchen, the aroma of cocoa danced joyfully around me, pulling me back to the sweet memories of family gatherings. The star of the show? My show-stopping Red Velvet Cheesecake Layer Cake. This luscious dessert blends velvety red cake with a sumptuous cheesecake layer, topped with a velvety cream cheese frosting that invites anyone to dig in. Perfect for celebrations or just a treat for yourself, it’s a crowd-pleaser that comes together quickly, making it an easy way to impress guests—or simply satisfy your own sweet tooth. Each bite boasts moistness and a delightful tang that keeps you coming back for more. Are you ready to discover how to create this stunning masterpiece?
Why is This Cake a Must-Try?
Irresistible flavor: The combination of rich red velvet cake and creamy cheesecake creates a flavor explosion that’s simply unforgettable.
Visual appeal: With its vibrant red color and elegant glaze, this cake is a showstopper at any gathering.
Versatile option: Perfect for birthdays, holidays, or just a delightful Sunday treat, it fits any occasion seamlessly.
Quick preparation: Easy to make, this recipe comes together without fuss, allowing you to impress without the stress.
Perfect pairing: Serve alongside a robust cup of coffee or a light mixed berry salad for a delicious harmony that balances richness.
You’ll love it so much, you might also want to check out my Banana Cake Moist or Coconut Loaf Cake for more sweet inspiration!
Red Velvet Cheesecake Layer Cake Ingredients
For the Crust
• Chocolate Cookie Crumbs – Base for texture and flavor; substitute with graham cracker crumbs for a different flavor profile.
• Butter – Binds cookie crumbs for the crust; use unsalted for better control over salt levels.
For the Cake
• All-Purpose Flour – Provides structure; gluten-free all-purpose flour can be used for a gluten-free option.
• Unsweetened Cocoa Powder – Adds chocolate flavor and color; ensure it’s unsweetened for a balanced taste.
• Baking Soda & Baking Powder – Leavening agents for rising; verify they are fresh for optimal leavening.
• Salt – Enhances flavor; avoid if using salted butter.
• Granulated Sugar – Sweetener for both cake and cheesecake layers; brown sugar can add moisture if desired.
• Vegetable Oil – Keeps the cake moist; can substitute with melted coconut oil for a different flavor.
• Eggs – Provide structure and moisture; use room temperature for better mixing.
• Buttermilk – Adds tang and moisture; homemade buttermilk can be made with milk and vinegar.
• Red Gel Food Coloring – Ensures vibrant red color; liquid coloring is not recommended as it dilutes the batter.
• Vanilla Extract – Adds flavor; pure vanilla extract is preferred for the best taste.
For the Cheesecake Layer
• Sour Cream – Enriches cheesecake layer’s texture; can substitute with cream cheese for added richness.
• Cream Cheese – Key ingredient for cheesecake with a smooth texture and tang; ensure it’s softened before mixing.
For the Glaze
• Strawberry or Raspberry Jam – Forms the red berry glaze; can substitute with other fruit preserves for variety.
• Heavy Cream – To adjust glaze consistency; can omit if jam is pourable as needed.
Whip up your own Red Velvet Cheesecake Layer Cake and indulge in its layers of flavor and decadence!
Step‑by‑Step Instructions for Red Velvet Cheesecake Layer Cake
Step 1: Prepare the Crust
Preheat your oven to 350°F (175°C). In a mixing bowl, combine chocolate cookie crumbs and melted unsalted butter until well blended. Firmly press this mixture into the bottom of a 9-inch springform pan to create an even crust. Bake the crust for 10 minutes, then allow it to cool completely while you prepare the cake layers.
Step 2: Bake Cake Layers
In a large bowl, whisk together the dry ingredients: all-purpose flour, unsweetened cocoa powder, baking soda, baking powder, and salt. In a separate bowl, combine the wet ingredients, including granulated sugar, vegetable oil, eggs, buttermilk, red gel food coloring, and vanilla extract. Introduce the wet mixture into the dry mixture, stirring until just combined, then distribute the batter evenly between two prepared 9-inch round cake pans. Bake for 25-30 minutes, or until a toothpick inserted in the center comes out clean. Let the cakes cool completely.
Step 3: Make the Cheesecake Layer
Reduce the oven temperature to 325°F (160°C). In a mixing bowl, beat the softened cream cheese and granulated sugar until smooth and fluffy. Add eggs one by one, mixing well after each addition, followed by the vanilla extract and sour cream. Pour this luscious cheesecake mixture over the cooled crust (or into a lined pan) and smooth the top. Bake for 40-45 minutes, watching for a slight jiggle in the center when complete. Cool, then refrigerate until set.
Step 4: Assemble the Cake
Once all layers are cooled, it’s time to assemble your Red Velvet Cheesecake Layer Cake. Place one red velvet cake layer on a serving platter. Carefully spread a thick layer of cheesecake over the first cake layer to create a luscious balance of flavors. Gently place the second red velvet cake layer on top of the cheesecake, aligning it carefully.
Step 5: Frost and Glaze
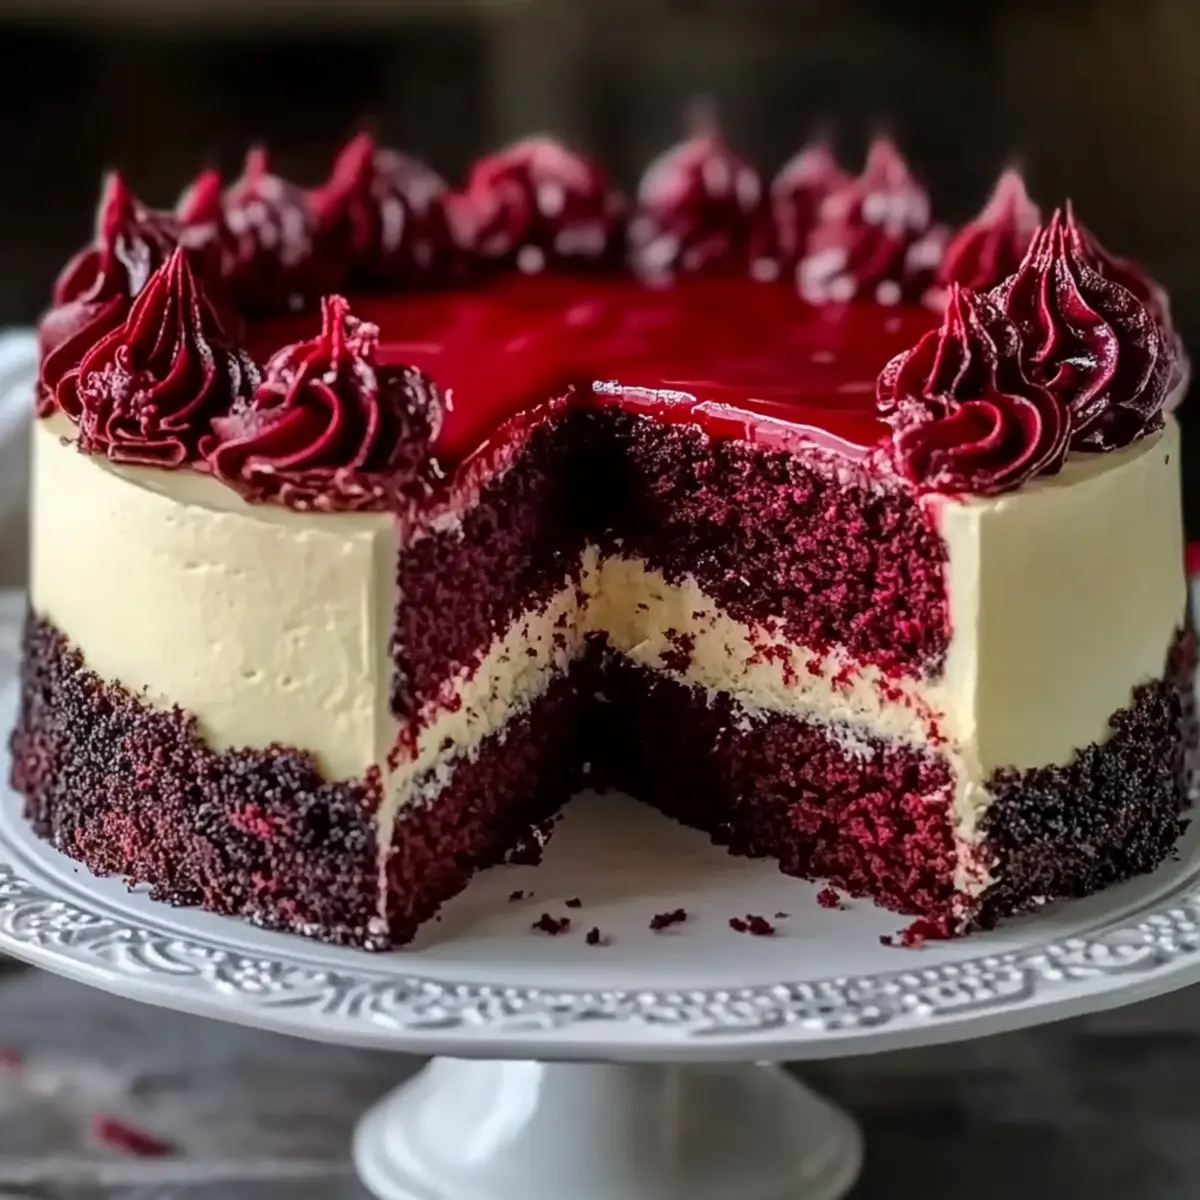
Prepare cream cheese frosting by beating together softened cream cheese, butter, powdered sugar, and vanilla until smooth. Frost the top and sides of your assembled cake with this silky cream cheese frosting, creating a beautiful finish. For a stunning presentation, drizzle the red berry glaze made from strawberry or raspberry jam over the top, allowing it to gently cascade down the sides.
Step 6: Decorate
For an extra touch of elegance, consider decorating your Red Velvet Cheesecake Layer Cake with fresh berries and chocolate chips. Arrange them artfully on top for a colorful visual appeal that complements the rich layers. Now, step back and admire your beautiful creation ready to impress your guests!
What to Serve with Red Velvet Cheesecake Layer Cake
Elevate your dessert experience by pairing this stunning treat with delightful accompaniments that enhance its rich flavors.
- Strong Brewed Coffee: The boldness of coffee complements the dessert’s sweetness, providing a comforting balance to each bite.
- Fresh Mixed Berry Salad: Light and refreshing, a mix of strawberries, raspberries, and blueberries adds a tangy contrast that brightens your palate.
- Vanilla Ice Cream: A scoop of creamy vanilla ice cream brings extra texture and a cool sensation that pairs beautifully with the warmth of the cake.
- Decadent Dark Chocolate Sauce: Drizzling dark chocolate sauce over each slice amplifies the indulgent experience, creating irresistible layers of flavor.
- Sparkling Rosé: For a celebratory touch, serve with a chilled glass of sparkling rosé; its fruity essence beautifully complements the cake’s richness.
- Creamy Custard: A smooth, vanilla-flavored custard adds a touch of elegance while balancing the cake’s sweetness with soothing creaminess.
- Coconut Whipped Cream: Light and fluffy, this alternative topping adds tropical notes that harmonize wonderfully with the red velvet layers.
- Lemon Tart: Start your meal with a zesty lemon tart, whose refreshing acidity offers a delightful counterpoint to the richness of the cake.
Expert Tips for Red Velvet Cheesecake Layer Cake
-
Avoid Overmixing: Gently combine ingredients to prevent a tough cake. Overmixing can lead to a dense texture that takes away from the lightness of your Red Velvet Cheesecake Layer Cake.
-
Check Freshness: Ensure your baking soda and baking powder are fresh. Old leavening agents can hinder your cake from rising properly, resulting in a less airy cake.
-
Room Temperature Ingredients: Remember to bring your eggs and cream cheese to room temperature before mixing. This helps create a smoother batter and a creamier cheesecake layer.
-
Jiggly Cheesecake: When baking the cheesecake layer, it should jiggle slightly in the center when it is finished. This indicates it is perfectly set and will firm up as it cools.
-
Gel Food Coloring: Use gel food coloring instead of liquid. Gel ensures a vibrant red hue without adding extra moisture to the batter, maintaining the ideal texture.
Red Velvet Cheesecake Layer Cake Variations
Explore delightful twists to personalize your Red Velvet Cheesecake Layer Cake and elevate its charm!
-
Gluten-Free: Use gluten-free all-purpose flour instead of regular flour for an inclusive option. This maintains delicious flavor while accommodating dietary needs.
-
Chocolate Lovers: Add chocolate chips to the cheesecake layer for a rich, indulgent touch. The added texture pairs beautifully with the creamy filling.
-
Healthier Option: Swap granulated sugar for coconut sugar for a healthier sweetness that brings a subtle caramel flavor without compromising on taste.
-
Nutty Crunch: Sprinkle crushed pecans or walnuts between the cake layers for extra crunch and a nutty flavor that complements the rich layers.
-
Fruity Fusion: Incorporate blended raspberries or strawberries into the cheesecake layer for a fruity surprise. This adds a refreshing burst of flavor, making each bite exciting.
-
Mini Versions: Bake individual mini cakes in muffin tins and layer them with cheesecake for adorable, grab-and-go treats. Perfect for parties or a fun dessert platter!
-
Exotic Spice: Add a pinch of cinnamon or nutmeg to the cake batter for an unexpected warmth and depth of flavor that pairs stunningly with the cream cheese frosting.
-
Cream Cheese Swirl: Instead of a solid cheesecake layer, create a marbled effect by swirling in additional cream cheese batter with the red velvet cake. This adds visual intrigue and a delightful taste experience.
With all these variations, your Red Velvet Cheesecake Layer Cake can be tailored to your heart’s desire! Whether you fancy a bold chocolate twist or a refreshing fruity addition, the possibilities are endless. You might also enjoy exploring the sweet depths of my Moist Chocolate Cake for more baking inspiration!
How to Store and Freeze Red Velvet Cheesecake Layer Cake
Fridge: Store your cake in an airtight container in the refrigerator for up to 4-5 days to maintain its freshness and flavor.
Freezer: For longer preservation, wrap individual slices tightly in plastic wrap, then place them in a freezer-safe container. This allows for freezing up to 2-3 months.
Reheating: To enjoy a slice after freezing, let it thaw in the refrigerator overnight. For a warm twist, gently microwave for 10-15 seconds to enhance the creamy cheesecake layer.
Quality Check: Always check for any signs of freezer burn when thawing your Red Velvet Cheesecake Layer Cake. If it looks good, it will still taste delightful!
Make Ahead Options
These Red Velvet Cheesecake Layer Cakes are a dream come true for busy home cooks looking to save time! You can prepare the cheesecake layer and bake it up to 3 days in advance; just refrigerate it until you’re ready to assemble. The red velvet cake layers can also be baked and wrapped tightly in plastic wrap (up to 24 hours ahead) to keep them moist. On the day of serving, simply frost the cake with the cream cheese frosting, drizzle the berry glaze, and finish with fresh fruit for a beautiful presentation. This method ensures that you’ll enjoy the same delicious flavors without the last-minute rush!
Red Velvet Cheesecake Layer Cake Recipe FAQs
What is the best way to select ripe ingredients for this recipe?
Absolutely! For the freshest taste, choose eggs that are free-range and at room temperature for baking. When selecting cream cheese, look for brands that have a smooth consistency and are close to the use-by date to ensure optimal creaminess in your cheesecake layer. As for butter, I recommend unsalted for better control over your cake’s flavor. Don’t forget to check your buttermilk; if you’re making it at home, mix together whole milk and a tablespoon of vinegar and let it sit for about 5-10 minutes for the best results!
How should I store the Red Velvet Cheesecake Layer Cake?
Very! After assembling your cake, store it in an airtight container in the refrigerator. It will stay fresh for up to 4-5 days. If you have leftovers, wrap individual slices tightly in plastic wrap and place them in a freezer-safe container for up to 2-3 months. Just remember to check for any signs of spoilage before enjoying!
Can I freeze Red Velvet Cheesecake Layer Cake?
Absolutely! To freeze, wrap the entire cake or individual slices tightly in plastic wrap, and then place them in a resealable freezer bag or a suitable container. This technique prevents freezer burn, allowing for delicious layers preserved for up to 2-3 months. When you’re ready to enjoy, simply thaw them in the refrigerator overnight, or for a quick treat, warm a slice in the microwave for 10-15 seconds—trust me, that cheesecake layer will melt in your mouth!
What are some common troubleshooting tips for this recipe?
If your cheesecake layer isn’t setting properly, it may be due to overmixing the ingredients or baking at too high a temperature. Keep a close eye on it while baking; it should appear slightly jiggly in the center when done, indicating it’s perfectly baked. For your red velvet cake, if it turns out dense, it might be due to overmixing as well. Always mix until just combined, and don’t forget to check that your leavening agents (baking soda and powder) are fresh for a fluffy texture!
Are there any dietary considerations for this dessert?
Very! This recipe is vegetarian-friendly, but if you have allergies, be mindful of the ingredients. For those with gluten intolerance, simply substitute all-purpose flour with a gluten-free blend. Additionally, for dairy-free options, consider using plant-based cream cheese and almond milk mixed with a teaspoon of vinegar as a replacement for buttermilk. Always read labels, as some packaged items, like baking powders or food colorings, may contain allergens.
How can I ensure the colors and flavors are balanced?
To achieve that stunning red hue without compromising your cake’s integrity, stick with gel food coloring versus liquid varieties. Gel gives you vibrant color while maintaining the batter’s texture. I often suggest tasting your frosting as you make it; if it’s too sweet, add a little pinch of salt to help balance the flavors beautifully, enhancing that signature tang you love in the cream cheese.

Decadent Red Velvet Cheesecake Layer Cake for Every Occasion
Ingredients
Equipment
Method
- Preheat your oven to 350°F (175°C). In a mixing bowl, combine chocolate cookie crumbs and melted unsalted butter until well blended. Firmly press this mixture into the bottom of a 9-inch springform pan to create an even crust. Bake for 10 minutes, then allow it to cool completely while you prepare the cake layers.
- In a large bowl, whisk together the dry ingredients: all-purpose flour, unsweetened cocoa powder, baking soda, baking powder, and salt. In a separate bowl, combine the wet ingredients, including granulated sugar, vegetable oil, eggs, buttermilk, red gel food coloring, and vanilla extract. Introduce the wet mixture into the dry mixture, stirring until just combined, then distribute the batter evenly between two prepared 9-inch round cake pans. Bake for 25-30 minutes, or until a toothpick inserted in the center comes out clean. Let the cakes cool completely.
- Reduce the oven temperature to 325°F (160°C). In a mixing bowl, beat the softened cream cheese and granulated sugar until smooth and fluffy. Add eggs one by one, mixing well after each addition, followed by the vanilla extract and sour cream. Pour this luscious cheesecake mixture over the cooled crust and smooth the top. Bake for 40-45 minutes, watching for a slight jiggle in the center when complete. Cool, then refrigerate until set.
- Once all layers are cooled, place one red velvet cake layer on a serving platter. Carefully spread a thick layer of cheesecake over the first cake layer. Gently place the second red velvet cake layer on top of the cheesecake.
- Prepare cream cheese frosting by beating together softened cream cheese, butter, powdered sugar, and vanilla until smooth. Frost the top and sides of your assembled cake with this silky cream cheese frosting. Drizzle the red berry glaze made from strawberry or raspberry jam over the top.
- Consider decorating your Red Velvet Cheesecake Layer Cake with fresh berries and chocolate chips for a colorful visual appeal.
Leave a Reply