
The sound of sizzling meat, the tantalizing aroma of garlic and ginger—who needs a restaurant when you can create a fiery feast right in your kitchen? This Benihana Hibachi Chicken recipe invites you to unleash your inner chef with high-heat cooking, delivering juicy chicken paired with colorful veggies and crispy fried rice. Not only is it an easy-to-follow recipe perfect for busy weeknights, but it also makes for an impressive dish to share with friends and family. With just a few adaptable ingredients, you can customize this tasty meal to suit your cravings. Ready to elevate your home-cooked dinner and impress your loved ones? Let’s dive in!
Why is hibachi chicken a must-try?
Flavorful Experience: This Hibachi Chicken captures the magic of teppanyaki with its rich garlic and ginger zest, making every bite a delight.
Quick Prep: With just a 20-minute marination and quick cook time, this recipe is a lifesaver for busy nights.
Versatile Ingredients: Feel free to swap the chicken for shrimp or tofu and customize your veggies for a meal that aligns perfectly with your tastes.
A Showstopper: Impress your guests with restaurant-quality flavors right at home, rivaling any outing! For more easy recipes using chicken, check out Pasta Ground Beef or Slow Cooker Beef.
Nutritional Punch: Packed with protein and vibrant veggies, it’s not just delicious; it’s good for you too! Enjoy a satisfying, balanced meal the whole family will love.
Benihana Hibachi Chicken Ingredients
For the Chicken
• Boneless Skinless Chicken Breast – This is your main protein; substituting with chicken thighs adds extra juiciness.
• Soy Sauce – Provides an amazing umami depth; use tamari for a gluten-free alternative.
• Hoisin Sauce – This sweet glaze is key for flavor.
• Rice Wine Vinegar – A splash adds a delightful tang.
• Garlic – Fresh garlic enhances the aromatic experience.
• Ginger – A must-have for that signature hibachi aroma.
• Toasted Sesame Oil – Gives a lovely nutty finish to your dish.
For Cooking
• Peanut Oil – Ideal for high-heat cooking; avocado or grapeseed oil can be swapped if needed.
For the Veggies
• Mixed Vegetables (e.g., zucchini, mushrooms, onions) – Add nutrition and color; feel free to customize with bell peppers or snow peas.
For Fried Rice
• Eggs – These help to bind the fried rice together beautifully.
• Cooked Rice – Day-old rice is best for frying, ensuring a perfect texture.
For Serving
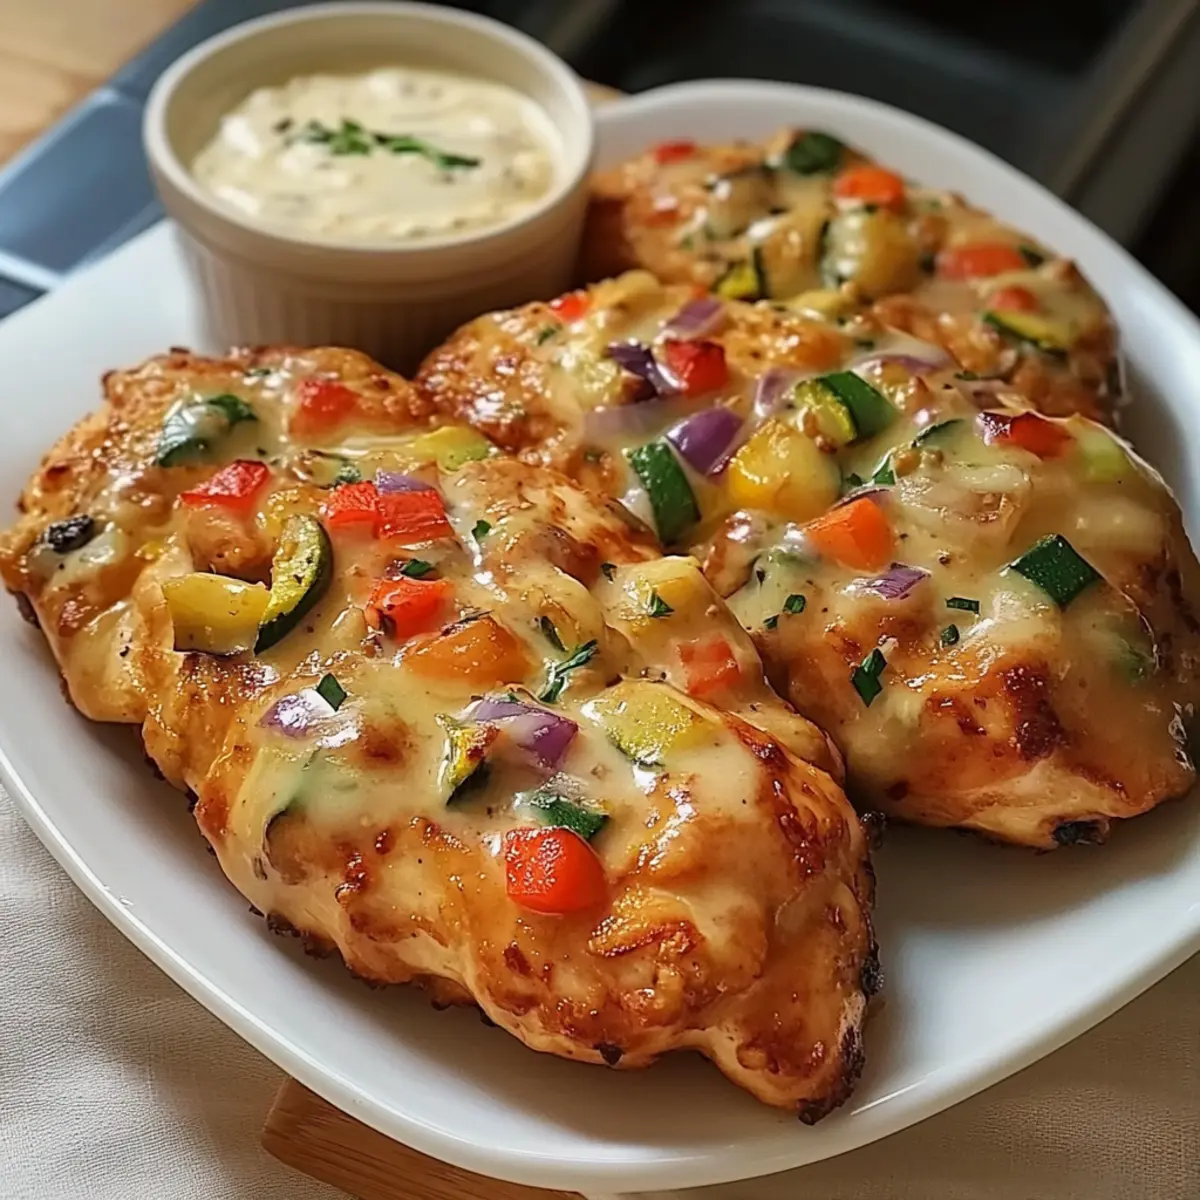
• Yum Yum Sauce – Serve alongside for that creamy, delicious touch; it can be homemade or store-bought.
Get ready to experience a mouthwatering adventure with this Hibachi Chicken dish that transforms your kitchen into a sizzling restaurant!
Step‑by‑Step Instructions for Authentic Benihana Hibachi Chicken
Step 1: Marinate Chicken
Begin by cubing your boneless skinless chicken breast into 1-2 inch pieces. In a bowl, combine soy sauce, hoisin sauce, rice wine vinegar, minced garlic, and ginger to create a savory marinade. Add the chicken pieces and coat them well, then let them marinate for at least 20 minutes. For enhanced flavor, you can marinate for up to 4 hours in the refrigerator.
Step 2: Prep Cooking Surface
Heat a cast iron skillet or flat-top griddle over high heat. Add 2 tablespoons of peanut oil, swirling to coat the surface. The oil should shimmer and appear hot, indicating it’s ready for cooking. It’s crucial to preheat adequately to achieve that authentic hibachi sear, which adds wonderful flavor to your chicken.
Step 3: Cook Chicken
Carefully add the marinated chicken to the hot skillet, allowing it to sit undisturbed for 2-3 minutes. This initial cooking will help develop a beautiful golden crust. Once seared, stir the chicken, cooking for an additional 3-4 minutes until fully cooked through. Ensure the internal temperature reaches 165°F for perfectly juicy hibachi chicken.
Step 4: Prepare Fried Rice
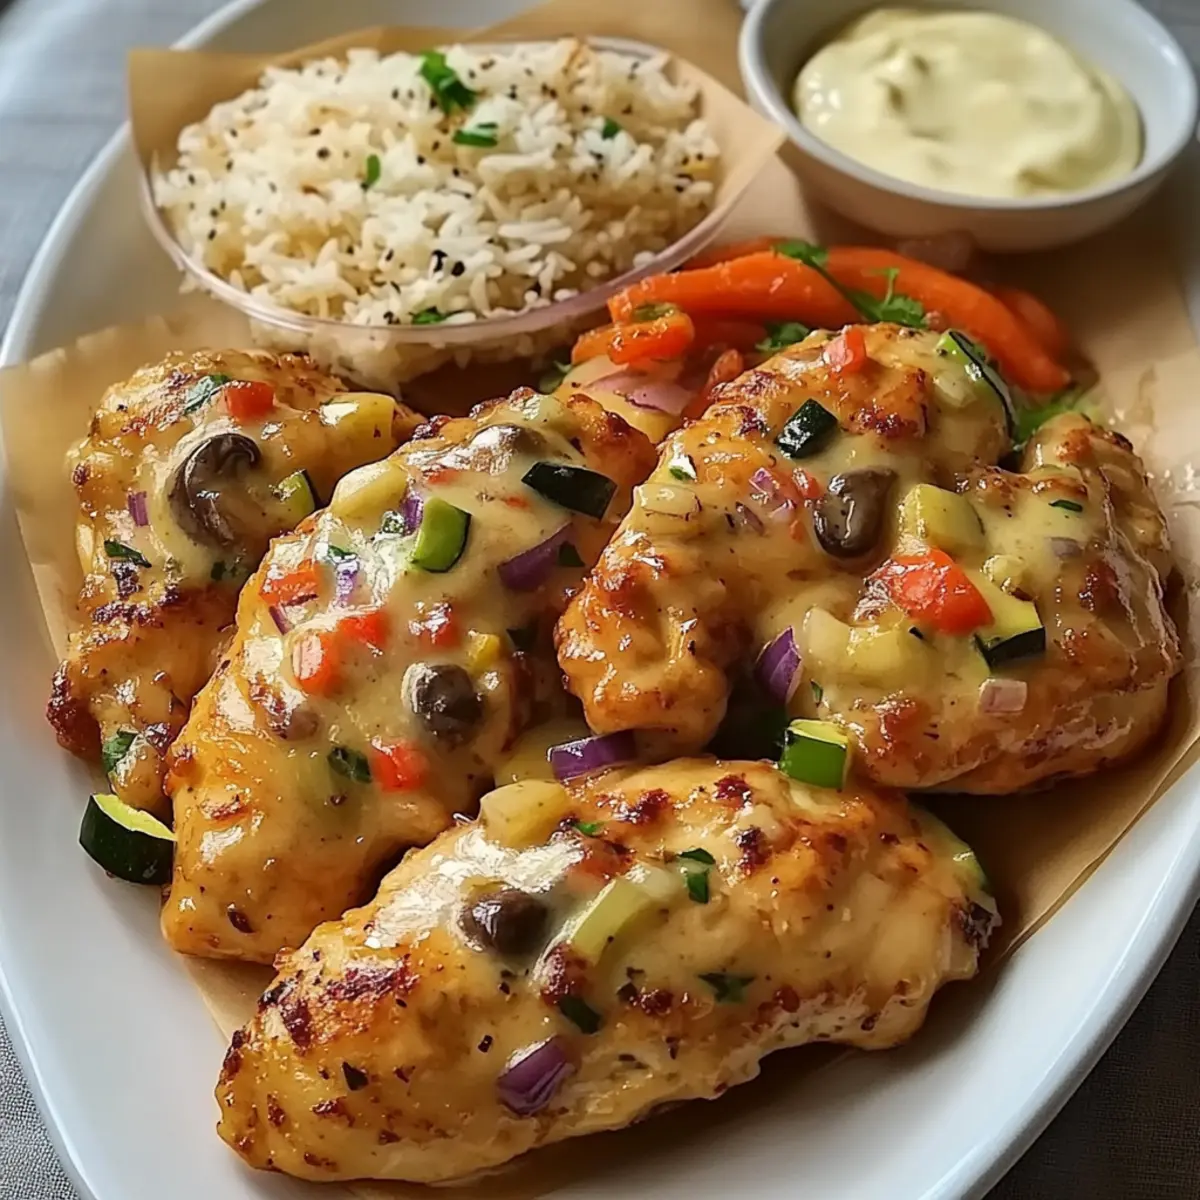
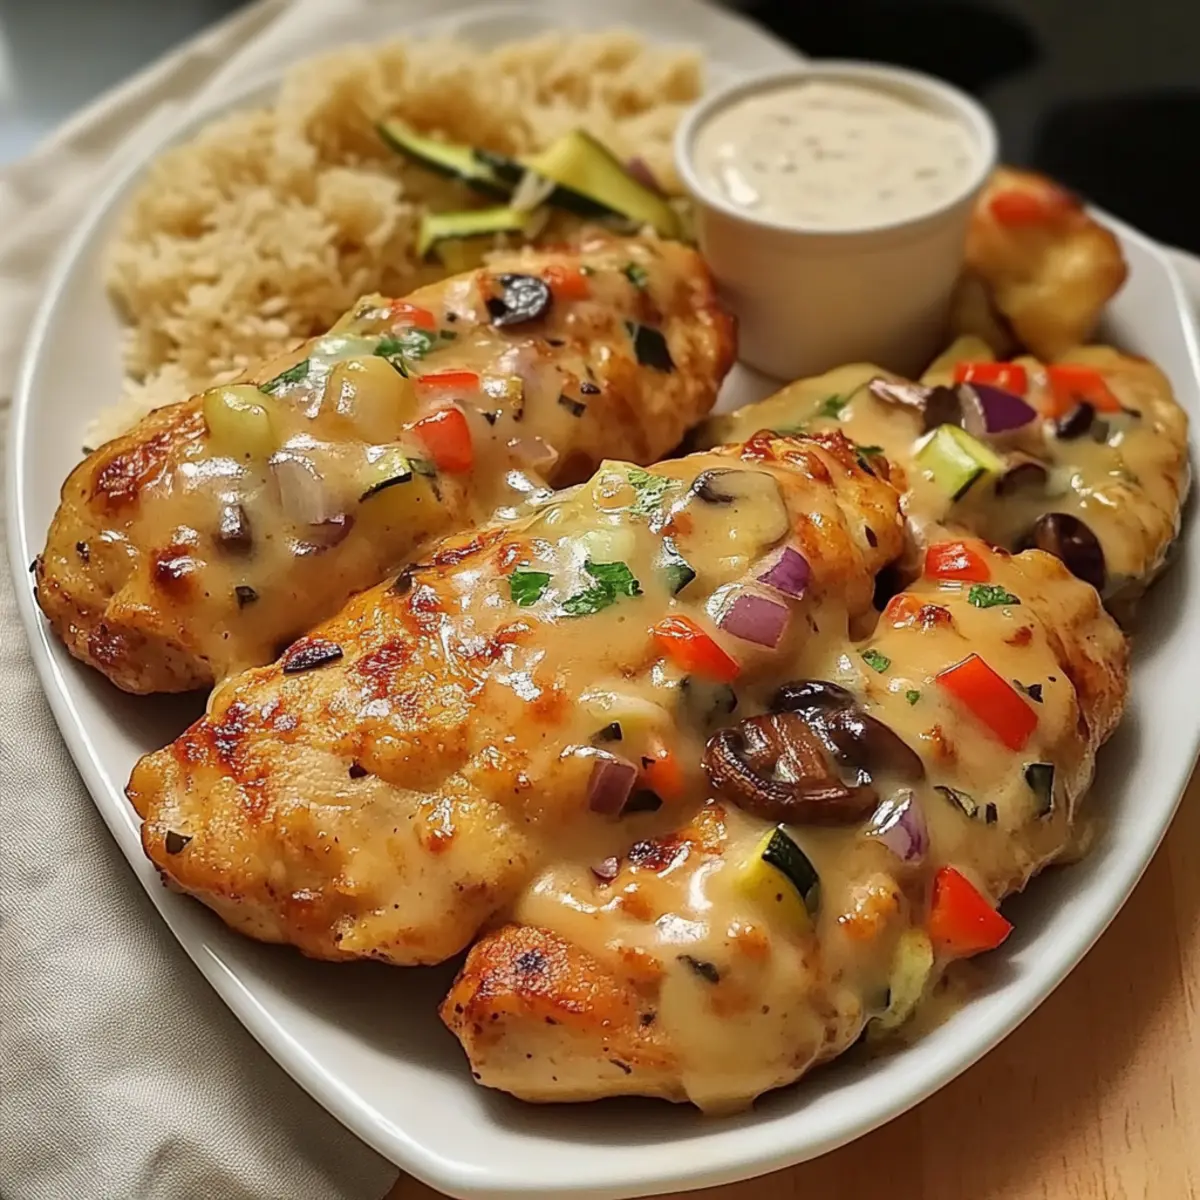
Push the cooked chicken to one side of the skillet and crack a couple of eggs into the empty space. Scramble them quickly until almost set, then mix in minced garlic and chopped onions. Stir in your day-old cooked rice, frying for about 10 minutes, allowing it to develop crispy bits. Drizzle soy sauce towards the end, ensuring the rice is evenly coated with its rich flavor.
Step 5: Sauté Vegetables
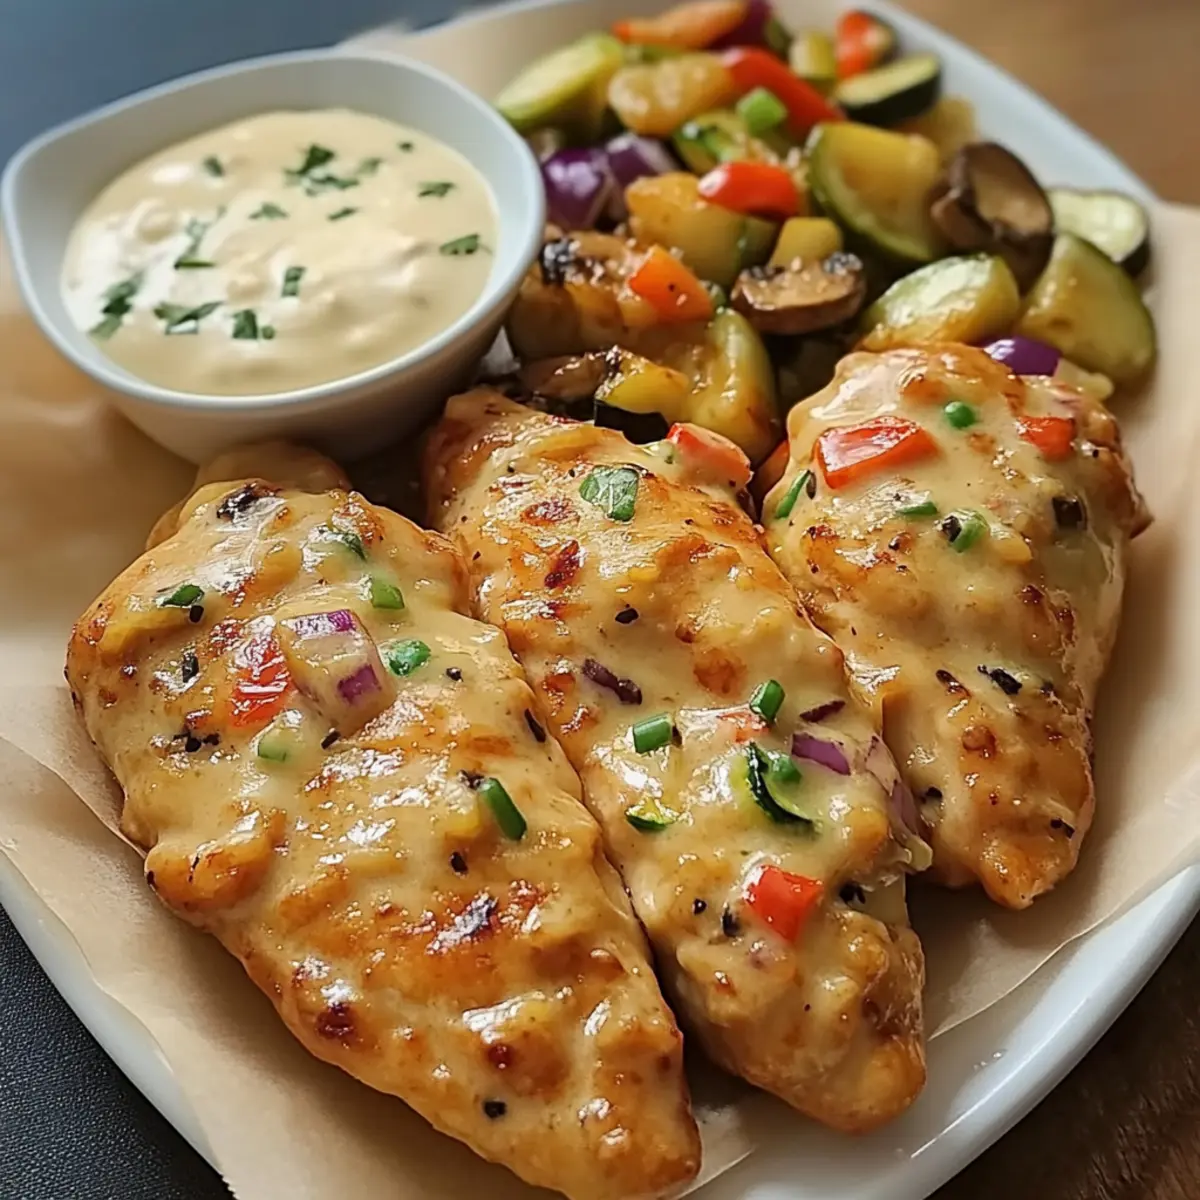
Next, toss in your mixed vegetables, such as zucchini, mushrooms, and onions, to the skillet. Stir-fry them for 3-4 minutes until they become vibrant and tender, but still crisp. This step highlights the freshness and adds colorful texture to your dish. The vegetables should be bright and fragrant, balancing beautifully with the hibachi chicken and fried rice.
Step 6: Serve
To finish, plate the hibachi chicken alongside the fried rice and sautéed vegetables. Drizzle with Yum Yum sauce for that signature creamy touch. Serve it warm for the best experience, and watch as your homemade meal brings the restaurant vibe right to your dining table. Enjoy the delightful flavors of your Authentic Benihana Hibachi Chicken!
Variations & Substitutions for Hibachi Chicken
Feel free to get creative and customize your hibachi chicken experience with these delicious variations!
-
Shrimp Swap: Replace chicken with shrimp for a quicker cook time and a seafood twist that’s just as flavorful.
-
Tofu Option: For a vegetarian version, swap the chicken for firm tofu; marinate it the same way for a protein-packed delight.
-
Veggie Variety: Use your favorite vegetables like bell peppers, carrots, or snap peas for added color and nutritional value. Mixing and matching make it special!
-
Spicy Kick: Add a teaspoon of sriracha or chili flakes to the marinade for an exciting heat level that’ll tantalize your taste buds.
-
Quinoa Base: Swap fried rice for quinoa to introduce a gluten-free grain option that adds a lovely nutty flavor and extra protein.
-
Alllow Your Creativity: You can try different sauces too! Go for a teriyaki or even a spicy peanut sauce for an entirely new flavor profile. Your hibachi can be uniquely yours!
-
Yum Yum Upgrade: Experiment with the classic Yum Yum sauce by blending in some chopped cilantro or citrus zest for a zesty finish.
For more ideas on how to incorporate chicken into delightful dishes, check out Korean Ground Beef or the comforting Ground Beef Potatoes!
What to Serve with Benihana Hibachi Chicken
Elevate your hibachi experience with complementary dishes that enhance the flavors and balance the meal beautifully!
-
Cucumber Salad: A refreshing twist that adds a crunchy, tangy contrast, perfect for cleansing the palate between bites.
-
Miso Soup: This warm, savory soup brings a comforting depth to the meal, further enhancing the umami characteristics of the hibachi chicken.
-
Japanese Pickles: The bright acidity of pickled vegetables brings zest and vibrancy, especially when served alongside rich hibachi flavors.
-
Tempura Vegetables: Light and crispy, tempura offers a delightful texture contrast while keeping with the Japanese theme of your meal.
-
Steamed Edamame: These tender, lightly salted soybeans are the perfect finger food to nibble while waiting for the main course, adding a healthy touch to the table.
-
Sake or Green Tea: Pair your meal with a glass of chilled sake for an authentic experience, or serve warm green tea for a soothing finish that complements the meal’s richness.
Storage Tips for Benihana Hibachi Chicken
Fridge: Store leftover hibachi chicken in an airtight container for up to 3 days. This helps to maintain its juicy texture and flavor.
Freezer: For long-term storage, freeze the chicken and fried rice separately in airtight bags for up to 3 months. This keeps the quality intact.
Reheating: When ready to enjoy, reheat in a skillet over medium heat with a splash of water or soy sauce to restore moisture and prevent drying out.
Thawing: Always thaw frozen hibachi chicken overnight in the fridge or use the microwave’s defrost setting for quick preparation.
Expert Tips for Hibachi Chicken
-
Perfect Sear: Preheat your skillet until hot; this ensures a delicious golden crust. Avoid overcrowding the pan to keep the heat consistent.
-
Marination Magic: For maximum flavor, let the chicken marinate longer, ideally up to 4 hours. Deeper marination enhances the taste of your hibachi chicken.
-
Day-Old Rice: Use leftover rice that’s been refrigerated overnight to prevent mushiness. Freshly cooked rice can stick together during frying.
-
Control Heat: Use a heavy-bottomed skillet to maintain high heat. If using non-stick pans, ensure they are rated for high temperatures to avoid damaging the surface.
-
Veggie Variety: Customize your mixed vegetables to include your favorites, like bell peppers or carrots, adding vibrant colors and textures to your dish.
Make Ahead Options
These Benihana Hibachi Chicken preparations are perfect for busy home cooks looking to save time during the week! You can marinate the chicken in the savory marinade for up to 24 hours in advance, locking in flavors and making your evening cooking much quicker. Additionally, you can chop the vegetables and store them in the refrigerator for a couple of days, which helps maintain their freshness and vibrancy. When you’re ready to serve, simply follow the cooking steps as outlined—cook the marinated chicken, prepare the fried rice, and sauté the prepped veggies. With this strategy, you’ll enjoy a delicious hibachi experience with minimal effort, getting dinner on the table faster than you can say “planning ahead!”
Benihana Hibachi Chicken Recipe FAQs
How do I select ripe ingredients for my hibachi chicken?
Absolutely! For the best flavors, choose fresh chicken without any dark spots and vibrant vegetables without signs of wilting or browning. Look for bright green zucchini, firm mushrooms, and onions with a smooth, papery skin. Fresh garlic should be firm and free from sprouting, while ginger should be smooth and crisp.
What is the best way to store leftovers?
Very! Store your leftover hibachi chicken in an airtight container in the refrigerator for up to 3 days. To maintain its texture, place the fried rice and chicken in separate containers. If you want to enjoy it later, consider reheating it in a skillet with a dash of water or soy sauce to restore moisture.
Can I freeze hibachi chicken?
Absolutely! To freeze, allow the hibachi chicken and fried rice to cool completely. Then, portion them into airtight freezer bags or containers. Make sure to remove excess air before sealing to prevent freezer burn. You can store them for up to 3 months. When ready to enjoy, thaw it overnight in the fridge or use the microwave’s defrost setting, then reheat in a skillet over medium heat.
What if my chicken turns out dry?
Don’t worry! If your chicken ends up dry, it’s often due to overcooking. Ensure you cook the chicken until it reaches an internal temperature of 165°F but no longer. To prevent this in the future, consider marinating the chicken longer, as well as checking it periodically while cooking to avoid that dreaded dry texture.
Are there any dietary considerations for hibachi chicken?
Yes, very much so! If you have any allergies, keep in mind that soy sauce contains gluten. Use tamari as a gluten-free alternative. Also, if you’re cooking for pets, avoid sharing seasoned foods, especially those with garlic or onion, as they can be harmful to them. Always ensure your dish aligns with any dietary restrictions.
How can I customize my hibachi chicken?
I often make it more exciting! You can substitute chicken with shrimp or even tofu for a vegetarian twist. Additionally, feel free to swap in any of your favorite vegetables, like carrots, broccoli, or even spicy options by adding sriracha to the marinade for a kick! Tailoring the dish to your preferences allows everyone to enjoy this meal.
Delicious Pizza Calzone with Beef: A Stuffed Delight!
Ingredients
Equipment
Method
- In a mixing bowl, combine flour, salt, sugar, and yeast. Add warm water and olive oil, mix until a dough forms.
- Knead the dough on a floured surface for about 5 minutes until smooth, then let it rise for 30 minutes.
- In a skillet, cook the ground beef until browned. Add pizza sauce, Italian seasoning, bell peppers, and onions. Stir to combine and heat through.
- Preheat the oven to 375°F (190°C). Roll out the dough into circles.
- Place a portion of the filling on one half of the dough circle, fold over, and seal the edges.
- Place calzones on a baking sheet and bake for 20-25 minutes until golden brown.
Leave a Reply